Cut your project along a precise plane and reveal exactly the details you need. When a section plane is active, everything on one side of the cut is hidden, so you can quickly focus on the details that matter.
These views can depict any 3D element — pools, pergolas, or complete property elevations — and can be incorporated directly into page layout.
Add Cross Section Block
 Go to Stage 14: Page Layout.
In the Panel, click Insert Block, then choose Cross Section from the dropdown.
Click on the page to place the block, and drag the corners to resize it as needed.
Edit Mode
Double-click Cross Section block to open it full screen in Edit Mode. Then use the gizmo to position the cross section symbol in your scene.
The black arrow on the symbol shows the direction the camera will face in the final cross section.
Move the symbol left, right, forward, or back to align it within or just in front of the object or area you want to highlight or cut through.
 Section Fill: Choose a custom color for filled areas such as concrete or soil.
Section Lines: Set the line color for your cross section outline.
Water Opacity: Adjust how transparent or solid water appears in the view.
Ground: Display the ground as a solid color or choose from available hatch patterns.
Visibility: Independently hide Custom Shapes, Plants and Trees, or Items from the view.

Cross Section Mode
Click the Cross Section button at the top of the panel to switch to a straight-on cut view of your design. This is the view that will appear on your construction plan.
In the viewport, zoom in or out to frame your view — if creating a cross section of an outdoor kitchen, zoom in until it fills the screen; if creating a full property cross section, zoom out until the desired area fills the screen.
 Backfill: Sets the background color behind the cross section. If backfill is off, the cross section will have infinite depth behind your design.
Depth: Controls how thick a slice of the design is visible. A depth of 4ft creates a 4ft slice of the scene — if your cross section symbol is aligned with a 4ft-deep outdoor kitchen, only that kitchen will appear. Increasing the depth to 20ft will include objects behind it as well.
Section Fill: Choose a custom color for filled areas such as concrete or soil.
Section Lines: Set the line color for your cross section outline.
Water Opacity: Adjust how transparent or solid water appears in the view.
Ground: Display the ground as a solid color or choose from available hatch patterns.
Add Measure: Activate and then move your cursor over objects in the scene. The tool will automatically snap to recognized features like pool walls.You can also click and drag between two points to place a custom measurement, such as from the edge of a house to the edge of a pool.
Any measurements you add here will be included on your page layout page when you exit.
Visibility: Independently hide Custom Shapes, Plants and Trees, or Items from the view.
ISO Section Mode
Click the ISO Section button to create an isometric view of your design. Choose Left ISO or Right ISO to set the viewing angle.
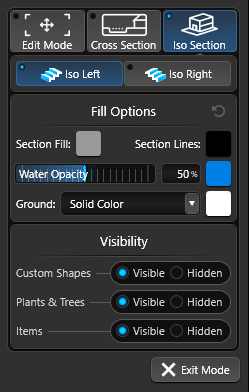
Section Fill: Choose a custom color for filled areas such as concrete or soil.
Section Lines: Set the line color for your cross section outline.
Water Opacity: Adjust how transparent or solid water appears in the view.
Ground: Display the ground as a solid color or choose from available hatch patterns.
Visibility: Independently hide Custom Shapes, Plants and Trees, or Items from the view.
Place on Your Page
When you click Exit Mode from either Cross Section or ISO Section, the cross section block is placed on the page and can be moved and positioned like any other block.
The aspect ratio and zoom level will be preserved exactly as they were set in your Cross Section or ISO Section preview.