Enter the property address to instantly load all the site information you need. With that data in place, you can design the project quickly and accurately—before you ever step onto the property.
Everything is seamlessly integrated so you can immediately understand key site conditions as you begin your design.
Step 1: GIS Data
 Head to Stage 1: Project Information.
This is the stage where you create the foundation for your project.
GIS Data: Press this button to insert GIS Data.
Enter the property address and the data is placed directly into your project, making it easy to calculate access.
Step 2: Search for the Address
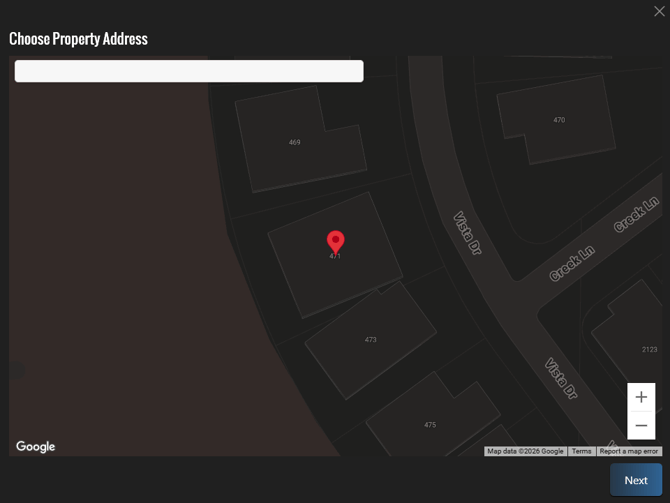
To search for the property address, open the GIS Search window and enter the address.
If the property is large, you can drag the pin to focus on the specific area of the property.
Step 3: Confirm the Details
After verifying the address, you will see the search results and image details displayed.
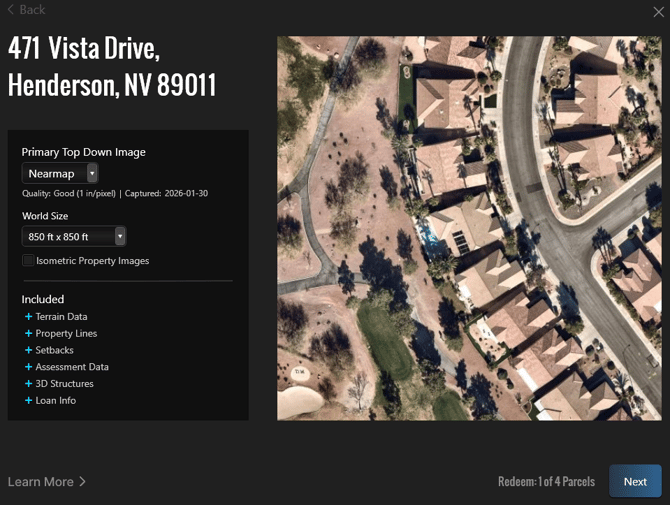
Primary Top Down Image: Includes a high-resolution, top-down view of the property.
- Nearmap (default): Generally the highest quality imagery and terrain data. Automatically draws the primary house structure. Available in US, Canada, Australia and New Zealand.
- Eagleview: Good Image quality. Available in US and Canada.
- Google Earth: Medium image quality, good terrain quality. Available globally.
Note: Property Lines, setbacks, assessment data, and 3D structures are currently only available in US and Canada.
Quality: Displays the quality of the image of the searched address.
- Good (Less than 4 inches per pixel)
- Medium (5 to 8 inches per pixel)
- Bad ( 8+ inches per pixel)
- Not Available
Date Captured: Displays the date the image was taken. When working in new development areas, ensure the date is recent.
World Size: Set the world size for your project. Left click the drop-down menu to choose the grid dimensions that work best for your design. The Top Down Image will fill the grid.
Isometric Property Images: Checking this box will include four additional angled views of the property: North, South, East, and West. These images are saved to your Projects > Screenshots folder.
If you’re happy with the results, you can purchase the data by clicking Next.
Step 4: GIS Parcel Credits
To download GIS data for a property, you’ll use one parcel credit per address.
You can buy parcels one at a time or save with discounted GIS Data Subscription plans.
GIS credits are associated with each Registerd Designer and Product Key.
Individual Parcels
- 1 Parcel: $29
Individual parcel credits are valid for one year from the date of purchase.
Any unused individual parcel credits will automatically expire after that time.
GIS Data Subscription
- 4 Parcels Per Month: $49 = ($ 12.25 per address)
- 10 Parcels Per Month: $99 = ($ 9.90 per address)
Non-cumulative parcel GIS data subscriptions renew automatically until canceled and include a set number of parcel searches per month, replenished on the software license billing date.

When making your first purchase Individual parcel credit, you will be prompted to add a new card. For future purchases, you can use the same card or add a different one.
Enter your credit card information, review the terms and conditions, and click Buy Now.
The GIS Data Subscription will automatically renew each month on your software billing date.
Step 5: Download GIS Data
Once the address is purchased, aerial imagery along with surveyed terrain data, automatically generated parcel lines, setbacks, 3D structures, and assessor property details is added to your project. The data is automatically set to scale, providing accurate measurements.
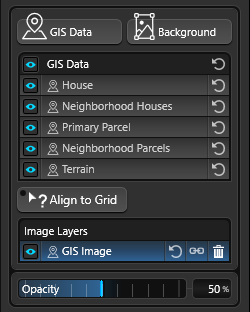
House: Automatically generated 3D house model for the searched address
Neighborhood Houses: Automatically generated 3D house models for nearby properties around the searched address.
Primary Parcel: Automatically generated parcel boundary and setbacks based on assessor property data.
Neighborhood Parcels: Automatically generated parcel boundary for properties around the searched address.
Terrain: Automatically generated terrain based on the elevation data surveyed at the address.
You will be able to see the terrain lines on both the 2D grid and in 3D mode.
Note: If the terrain data was captured before the property was developed, you may need to make adjustments to the terrain.
Assessor Property Details
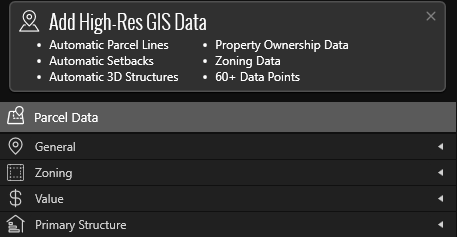
Click Smart Data to access detailed assessor records for the property, including ownership information, mailing address, parcel ID, and tax details, as well as zoning and land-use data.
Use this information to confirm who owns the property, understand how the land is classified and regulated, and quickly verify that your design complies with local zoning requirements and setbacks.
Step 6: Align Image to Grid (If Needed)
Once the GIS image is positioned behind the drawing grid and the terrain elevation data is set, the image will automatically load with North at the top of the grid.
If the property is at an angle, you can easily align the image on the grid to draw with straight lines.
Align to Grid: When you enable Align to Grid, click a line segment — a parcel or house line — to center it on the grid. The software will rotate the GIS image and all generated data so everything aligns to that line. For the smoothest design workflow, align the back of the house so it runs straight along the grid.
GIS Image: A high-resolution, top-down image of the property, displayed in 2D.

Reset: This option allows you to restore the GIS Data to the downloaded orientation.
Link: Rotate GIS background image with all linked GIS data.
Unlinked: Rotate GIS background image without linked GIS data.
When Link is enabled (default), the GIS background image and all automatic structures and terrain rotate together. When Link is disabled, only the GIS background image rotates, while all shapes and terrain remain fixed in place.
Delete: This option allows you to delete the GIS (Primary Top Down) Image displayed in 2D.
Opacity: This slider allows you to adjust the transparency of the GIS image. It can be useful when you also have a Background image loaded and want to display both.
Step 7: Present Your Vision and Ideas in 3D
Draw your design using the GIS information.
%20copy.webp?width=670&height=377&name=Vip3D%20Version%204%20(19)%20copy.webp)
Complete List of Available Assessor Property Details
General-
Site Address
-
Parcel Number
-
Alternate Parcel Number
-
County
-
Owner Name
-
Use Code
-
Use Code Description
-
Legal Description
-
Lot Number
-
Block Number
-
Pool Indicator
-
Zoning Assessment
-
Book
-
Page
Zoning
-
Zoning Summary
-
Front Setback
-
Side Setback
-
Rear Setback
-
Maximum Site Coverage
-
Minimum Lot Area
-
Maximum Building Height
-
Ordinance URL
-
Jurisdiction Name
-
Jurisdiction Type
-
Jurisdiction ID
-
Zoning Code
-
Zoning District
-
Zoning Description
Property Value
-
Potential Equity
-
Valuation Model Value
-
Improvement Percent
-
Tax Year
-
Tax Amount
-
Loan Value
-
Loan Lender
-
Loan Recording Date
-
Last Market Sale Seller
-
Last Market Sale Buyer
-
Last Market Sale Date
-
Last Market Sale Title
Primary Structure Information
-
Year Built
-
Year Renovated
-
Rooms
-
Bedrooms
-
Baths
-
Parking Spaces
-
Stories
-
Fireplace
-
Heating
-
Construction
-
Roof
-
Air Conditioning
-
Garage