Custom Shapes – Stage Options
With Custom Shapes, much of the work on this stage is done in the 3D view. Shapes drawn in the 2D view can be tilted upright on the axis in the 3D view. This allows an upright arch to be drawn flat and then tilted up.
When creating custom shapes it is important to understand how Height and Elevation relate to your shape. The height is the thickness of the object while the elevation is the distance the object is above the ground.
With some custom shapes, the height will represent the length of the object. Cylinders are created by first drawing a circle and then setting a height to represent the length. A 5-foot-long cylinder would be created by drawing a circle and giving it a height of 5 feet.
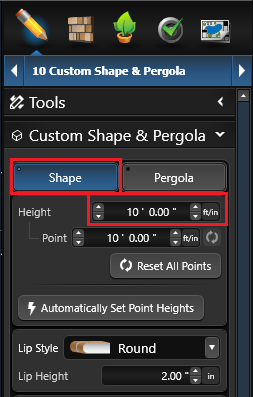 Height: The Height control is located under the Stage Options. To set an object’s height, enter a number into the Height box or use the up and down arrows. For custom shapes, height represents one of the dimensions of the object.
When creating an object such as a balcony or an upright arch, the height is the thickness of the object. For example the height of a balcony would usually be 6 inches, representing the thickness of the balcony.
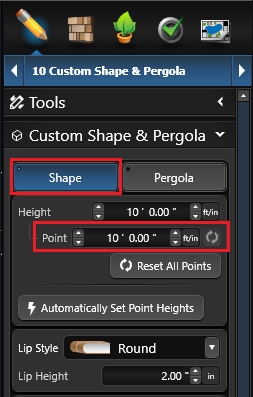
Point Height: To set an object’s height, enter a number into the Height box or use the up and down arrows.
For custom shapes, height represents one of the dimensions of the object.
In 3D these points are represented in Blue.
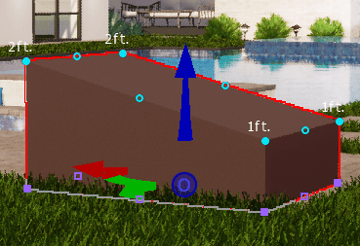
The Blue Points make it easy to adjust the entire face of an object: you can set a custom height at each corner or you can use the Blue Center Point to adjust the entire face evenly.
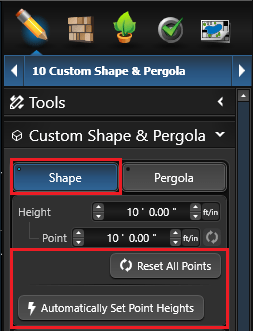
Reset All Points: This button resets all points to the height set in the height box. Please Note:
This is not an undo button. It will not undo just the last change you made to the custom shape. It will undo every point height change you have made to the shape. You may undo the reset with the Undo button.
Automatically Set Point Heights: This button will automatically set the point heights.
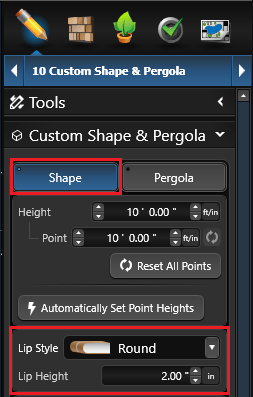
Lip Style: The Lip Style Control is also located under the Stage Options. Select the lip style for your custom shape from the drop-down menu. A preview of each style is to the left of the name.
Lip Height: This control allows the height of the Lip to be adjusted from 1″ to 6″. Default is 3″.
To create a flat edge, simply select the Lip Style None from the drop-down menu.
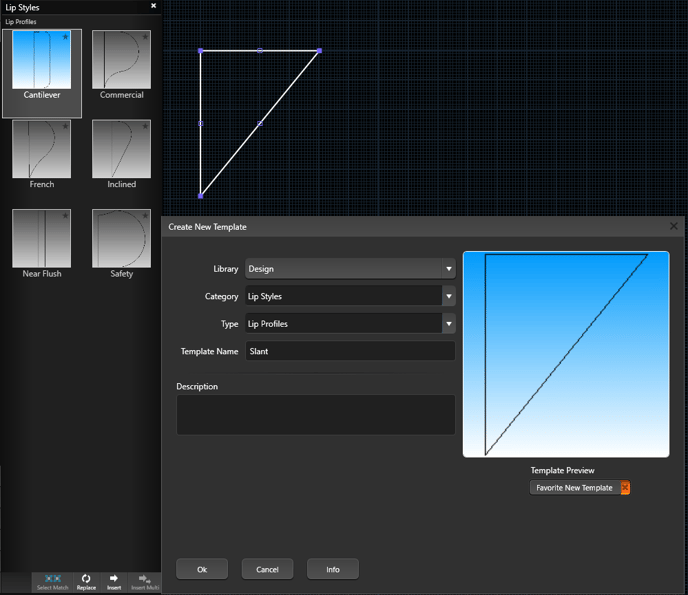
Create Custom Lip Profiles: Left click the Custom Profile button to open the Lip Styles Library. In 2D, draw the profile with the flat side to the left, and save it to this category.
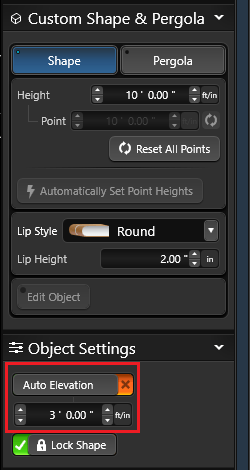
Elevation: A custom shape’s Elevation may be set manually under the Object Tab, but more often the elevation is changed by selecting the object in 3D and moving it with the 3D gizmo. For custom shapes, elevation represents the position of the object, specifically the distance between the object and the ground. An elevated object is floating in the air above the ground.
You may manually set the elevation of a selected custom shape by using the controls under the Object Tab. When checked, the Auto Elevation box will plant the custom shape on the ground. With the box unchecked, you may manually enter an elevation into the Elevation Box. The higher the elevation, the higher the object will be above the ground. A negative elevation will place the object below the ground.
NOTE: Elevation is measured from the bottom of the object.
For example, if the top of an object that has a height of 14 feet and an elevation of 10 feet, the top will be 24 feet above the ground. Along the same line, an object with a height of 10 feet and an elevation of -8 feet will appear 2 feet tall in the design.
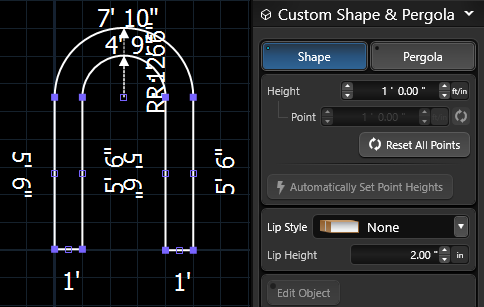
1. Draw the Shape in 2D
First use the regular tools to draw a flat shape in 2D.
Once the shape is complete, set the Height under the Stage Options tab to 1 foot.
2. Rotate the Shape in 3D
In 3D, use the Rotate tool on the shape. This will allow you to tilt the shape up.
When you have the rotate tool selected, rotating arrows will appear on the 3D gizmo. These guide arrows make it easy to see which direction each arrow of the 3D gizmo will rotate the shape.

The alignment button in the center of the 3D gizmo allows you to change the orientation of the arrows between world or object alignment. Using the rotate tool will allow you to bring a shape from flat on the ground to standing straight up. The shape will rotate with regard to your settings under Snaps and Constraints.
3. Appearance in 2D
 By default, the 2D view shows a top-down view of all objects. Therefore, only the top of objects that have been titled straight up will show.
Editing Rotated Objects in 2D
 Objects that have already been rotated on an axis can be edited under the Stage Options tab with Edit Object or under the Object Tab with Reset Object.
Edit Object: This button will temporarily reset a shape back to its original state to allow you to edit it. Pressing the button again will rotate it again.
Reset Object: Pressing this button will reset the shape back to its original state before being rotated.
Pergola – Stage Options
It’s easy to adjust pergolas by simply double clicking on any given section.
As you double click on each section of the pergola, the panel menu updates to show you the options available. You can also click on the various sections in the panel menu to switch as well.

Rafters
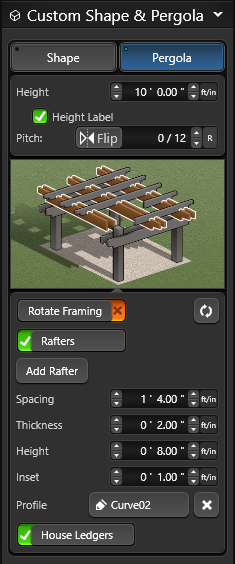 Height: This option allows the pergola height to be adjusted.
Pitch: This option allows you to create an angled pergola.
Rotate Framing: Toggle allows you to rotate the framing 90 degrees on a selected pergola.
Rafters: Toggle allows you to add or remove rafters to a selected pergola.
Add Rafter: This button allows you to add a rafter.
Spacing: This control allows the spacing of the rafters to be adjusted.
Thickness: This control allows the thickness of the rafters to be adjusted.
Height: This control allows the height of the rafters to be adjusted.
Inset: This control allows the rafter to be inset.
Profile: This control allows the profile of the rafters to be customized.
House Ledgers: Toggle allows you to add a house ledger to a selected pergola.
Rafter Slats
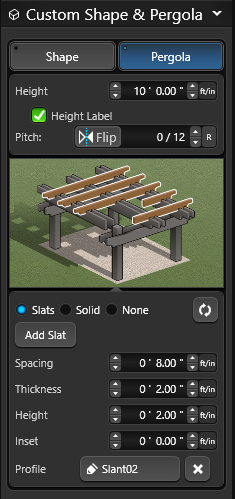 Slats / Solid / None: Allows you to add or remove slats or a solid cover to a selected pergola.
Add Slat: This button allows you to add a slat.
Spacing: This control allows the spacing of the slats to be adjusted.
Thickness: This control allows the thickness of the slats to be adjusted.
Height: This control allows the height of the slats to be adjusted.
Inset: This control allows the slats to be inset.
Profile: This control allows the profile of the slats to be customized.
Rafter Supports
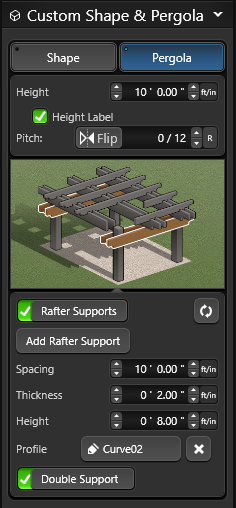 Rafter Support: Toggle allows you to add or remove rafter supports to a selected pergola.
Add Rafter Support: This button allows you to add a rafter support.
Spacing: This control allows the spacing of the rafter supports to be adjusted.
Thickness: This control allows the thickness of the rafter supports to be adjusted.
Height: This control allows the height of the rafter supports to be adjusted.
Profile: This control allows the profile of the rafter supports to be customized.
Double Support: Toggle allows you to add or remove double supports to a selected pergola.
Columns
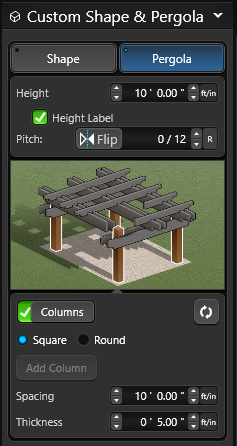 Columns: Toggle allows you to add or remove columns to a selected pergola.
Square or Round: Choose between Square or Round columns.
Add Column: This button allows you to add a column.
Spacing: This control allows the spacing of the columns to be adjusted.
Thickness: This control allows the thickness of the columns to be adjusted.