Type in the property address and aerial images will be inserted directly into your Vip3D project. This allows you to automatically generate 3D terrain, trace existing structures, and calculate access.
You have all the information you need to design the project quickly and accurately before stepping foot on the property.
Note: This feature is not available in the free trial.
Step 1: Insert GIS
 First, go to Stage 1: Project Information.
This is the stage where you create the foundation for your project.
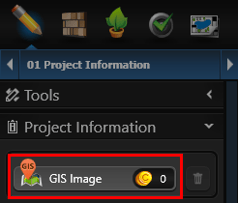
Insert GIS Image: Press this button to insert a GIS Image.
Trash Can: Press this button to Delete the GIS Image.
Step 2: Search for the Address
The GIS Search window will come up. Here we type in the address of the property.

The software remembers the last 5 addresses searched. Click the down arrow to select one of these addresses.
Step 3: Confirm the Image Details
Once the address is verified, the results of the search and details of the image are displayed.
Click the checkbox to the right of each part of the GIS data to include or remove it from the purchased download.
As a general rule, the more populated the area, the greater the image quality, and the more recent the images will be.
_Photos/2017/summer-2017-update/gis.jpg?width=600&height=396&name=gis.jpg)
Overhead Image: Includes a high-resolution, top-down view of the property.
Quality: Displays the quality of the image of the searched address.
- Good (Less than 4 inches per pixel)
- Medium (5 to 8 inches per pixel)
- Bad ( 8+ inches per pixel)
- Not Available
Date Captured: Displays the date the image was taken. When working in new development areas, ensure the date is recent.
Terrain Data: Surveyed terrain data will be automatically added to the Terrain stage using the Multiple Slope tool, and appear in both 2D and 3D.
Parcel Line: Checking this box will display the parcel line of the property. The yellow parcel line is for reference only and can be slightly offset from the property.
Angle Images: Checking this box will include four additional angled views of the property: North, South, East, and West.
If you’re happy with the results, you can purchase the images by clicking Next.
Step 4: Purchase GIS Credits
Each downloaded property address costs a single credit. Credits can be purchased one at a time or in discounted bulk packages:
- 1 Credit: $12
- 5 Credits: $55 = ($ 11 per address)
- 10 Credits: $99 = ($ 9.90 per address)
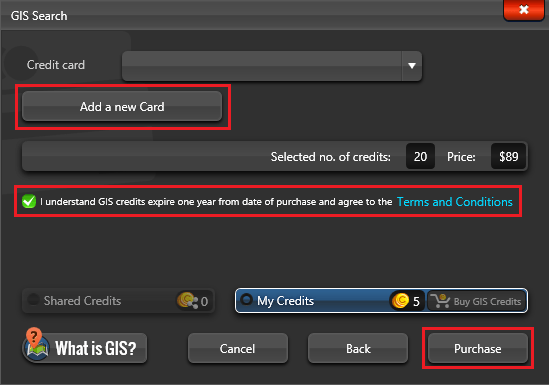
When you’re ready to purchase a GIS image, select the number of credits you’d like, add a credit card and then click the Purchase button.
On your first purchase, you will be asked to Add a New Card. Future purchases can be charged to the same card, or you can add a different card.
Enter the credit card information, review the terms and conditions, and press the Purchase button.
The GIS credits will immediately reflect in your account.
GIS credits linked to each designer profile and Product Key and are separate from the main account.
NOTE: GIS credits are valid for one year from date of purchase. If not used, credits expire after one year.
Step 5: Download the Images & Terrain Data
Once the address is purchased, the five images and terrain elevation data will download. The top-down image and terrain data are automatically set to scale, providing accurate measurements.
Main Image
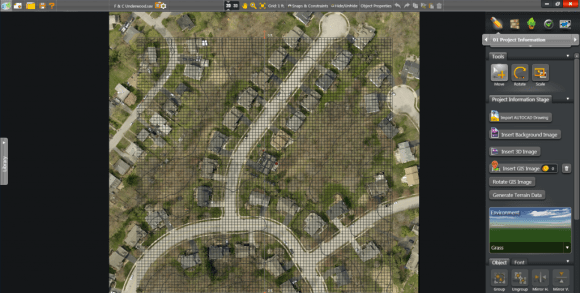
A high-resolution, top-down property image. Vip3D will automatically scale the image and place it behind the drawing grid.
Four Angled Images
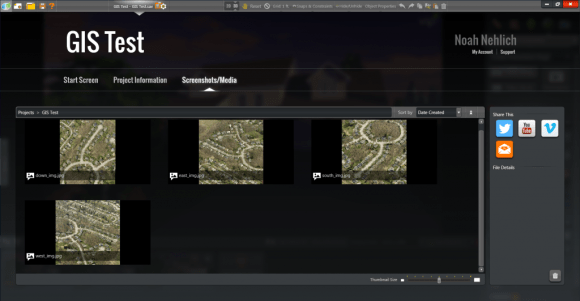
The North, South, East, and West images are saved to your Projects > Screenshots folder.
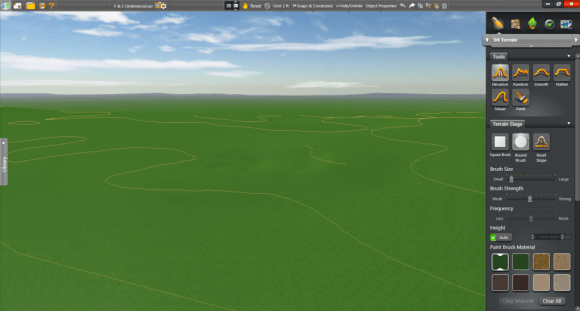
3D Terrain
The terrain will automatically generate based on the surveyed elevation data of the address. This allows you to quickly convert geographic data into interactive 3D presentations.
The terrain lines will appear on the 2D grid and in 3D mode.
Step 6: Rotate Image & Re-Generate Terrain (If Needed)
Now the GIS image is behind the drawing grid and the terrain elevation data is set.
The GIS image will automatically load with North at the top of the grid. If the property is at an angle, rotate the image on the grid to draw with straight lines.
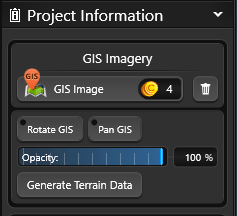 Rotate GIS Image: This option allows you to adjust the image on the grid. Click this button to bring up midpoint arrows that allow you to rotate the image.
Hold down the left mouse button and drag in the center to move it. The image will move and rotate based on your snaps and constraints.
Pan GIS Image: This option allows you to pan the image on the grid. Click this button to pan the image.
Hold down the left mouse button and drag in the center to move it.
NOTE: Once the image is rotated or panned, we also need to update the Terrain. A popup box will ask if you want to refresh the terrain data. Click Yes to automatically reload the terrain at the new image location. Click No to leave the terrain as is. To manually reload the terrain, use the Generate Terrain Data button.
Opacity: This slider allows you to adjust the transparency of the GIS image. It can be useful when you also have a Background image loaded and want to display both.
The Generate Terrain Data button will reload the terrain at the new angle. The original terrain will be removed and redrawn based on the new angle of the image.
Generate Terrain Data: This option allows you to manually reload the terrain data to match the new location of an adjusted image. Click this button once the image is rotated or panned into position, or to restore the Terrain to the original settings if adjusted in the Terrain stage.
NOTE: Terrain alterations may be needed if the terrain data was captured before the property was developed.
Step 7: Use the Drawing Tools to Create the Project
Add the Parcel Line: The yellow border around the property indicates the parcel line. Trace the yellow parcel line in the image in the Walls, Fences, and Railing stage. Use the Measure Guide to verify the fence is the correct distance from the house.
NOTE: Property lines are created from instrument field surveys by county government property assessors. Property line data is ‘planning grade,’ not survey grade. Their purpose is to guide navigation to a property. Projection errors can happen to varying degrees and should be anticipated.
TIP: If the parcel line is not lined up with the property, carefully trace the yellow parcel line with the Line Tool. Next align the new line shape using visual cues (such as curbs and fences) in the GIS image.
Add Existing Elements: Trace the house, structures, and hardscapes from the image. While you are working, you may wish to hide the image to see what you have traced. You may quickly hide or reveal the image in the Hide/Unhide menu or by pressing CTRL+SHIFT+B.
Add Details: Use the four angled images in your Screenshots Folder to add details (such as eaves and roof overhangs) and see the appearance and location of doors and windows.
Step 8: Present Your Vision and Ideas in 3D:

Create Construction Plans: The GIS Image will also appear in your Construction plans. Calculate access areas, easements, utility lines, or other important information in construction markup and layout.