Stage Options
Steps and benches will only appear when created inside a pool or spa.
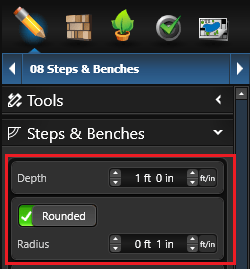
Depth: Determines the depth of the steps and benches from the top of the deck.
The higher the number, the lower into the water the steps will appear. The lower the number, the higher in the water the steps will appear. If you set the depth to a negative number the steps will rise above the water.
Rounded: By default, the edge of the steps will be rounded. Uncheck this option to make the step edge square.
Radius: This option allows the radius of the rounded edge to be adjusted.
To add tile, simply open the Trim Tile settings and select from amongst the options:
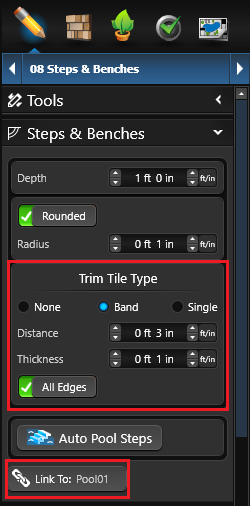
None: No tile
Band: Add a strip of tile along the front edge of the step (but not where the step meets the pool edge, spa edge, or a taller step).
Single: Add single tiles spaced along the front edge of the step.
Distance: This control adjusts the distance from the edge the tile line appears
Thickness: This control allows the thickness of the band or the size of the tile to be adjusted.
All Edges: By default, the tile will follow along the front edge of the step; check this option to wrap the tile around all edges.
Link To: Link the created steps to selected shape. Linked shapes move/scale/rotate together, as if they all are only one shape. By default, the steps are linked to the pool or spa they are created in.
_Photos/2017/steps-and-benches/trim-tile-options.jpg?width=688&height=206&name=trim-tile-options.jpg)
Note: If your steps or benches do not appear in 3D or do not appear properly, check to make sure they are linked to the correct shape.
If the Link To button says link to none, the step or bench is not linked properly.
You can change the shape you want to link the steps to by single-clicking the Link To icon and selecting the desired shape.
Auto Pool Steps
To create steps automatically, click the Auto Pool Step tool. A step will instantly appear, attached to the cursor. You can move it anywhere in the pool and spa — it will attach to the wall as well as to other steps and benches.
Select where you’d like to add steps, move the cursor, and left click to place the new steps. The software will automatically calculate exactly how many steps are needed to reach the pool floor, and it will extend automatically to fill the area (up to 10 feet in length).
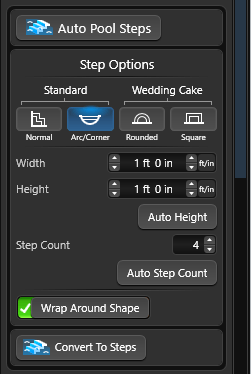
4 Staircase Types are Available:
Normal: Straight stairs feature a single linear flightArc/Corner: Straight stairs that start on an arc or corner
Rounded: Round wedding cake style steps
Square: Square wedding cake style steps
Once the staircase is placed, you can customize the Staircase by using Staircase Options below.
Manual Adjust
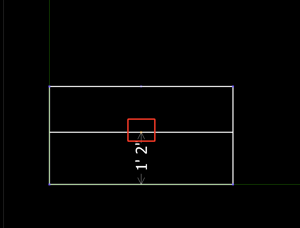
Manually adjust individual steps by dragging the step center point forward or back.
This helps easily create a tanning ledge (also called: Baja shelf, Shamu shelf, Cabo shelf, Sun shelf).
Wedding Cake Steps
_Photos/2017/steps-and-benches/wedding-cake.jpg?width=688&height=344&name=wedding-cake.jpg)
These steps got their name because they look like a traditional Wedding Cake: they start with one small step, and then each additional step expands outward, just like the layered tiers of a cake.
Wedding Cake steps can feature both Rounded and Square styles: simply click on the option you prefer for your design.
Once you’ve placed Wedding Cake steps, it’s easy to adjust them using the same tools available to other styles of steps.
Staircase Options
Width: This control allows you to adjust the width of each step. To adjust the width of an individual step, use the point on the center of the step.
Note: Adjusting the step width in the panel will reset all manually adjusted steps.
Height: This control allows you to adjust the height (or rise) of each step.
Auto Height: This button automatically adjusts the staircase to fit. For example, if Auto Height is selected and you change the height of each step, the step count will automatically change.
Step Count: This control allows you to adjust the number of individual steps in the selected staircase.
Auto Step Count: This button automatically adjusts the number of steps in the selected staircase. For example, if Auto Step Count is selected and you change the depth of each step, the step count will automatically change.
Wrap Around Shape: By default, the step will wrap around the shape; uncheck this option to not wrap.
Spa Bench
 To add a bench that goes fully around the inside of a spa, use the Auto Pool Step tool.
Click to add an Auto Step, and attach it to the inside of the spa. Adjust the Step Count to one and use the Move tool to wrap it around the inside of the spa.