Type-In Measurements
Create an entire project by typing in precise measurements as you design. While in 2D, you have the option to type in measurements when using tools and the measure guide.
Type In Measurements Video
Line Tool
The Line Tool is for creating straight segments. With the Line Tool active, position the cursor in the viewport and single-click the left mouse button to mark the beginning of the line. Simply type in a number to represent the length of the line.

For example: To create a line that is 10 feet, you would type 10. Next assign the angle of the line, by pressing Tab or Forward Slash ( / ) and typing in the angle. Press Enter to draw the line segment.
To create a line that is 4 feet 6 inches, you would type 4 Spacebar 6 or 4.5. Next assign the angle of the line, by pressing Tab or Forward Slash ( / ) and typing in the angle. Press Enter to draw the line segment. You can also use length and angle independently. For example: Type in the length of 4′ 6″ and use your mouse cursor to set the angle. The length of 4′ 6″ will stay locked while you move your cursor to the correct angle. Press Enter to draw the line segment.
Or you can press Tab or Forward Slash ( / ) to skip the measurement box and Type in the angle you need. This will allow you to draw the line at a specific angle, and move the cursor to set the line length. Press Enter to draw the line segment.
Arc Tool
The Arc Tool is for creating curved segments in your shapes. This tool operates in two steps: first a parent circle is sketched, then a portion of the circle is traced to create an arc.
With the Arc Tool active, position the cursor in the viewport and single-click the left mouse button to mark the beginning of the arc.

Step One: Type in a number to represent the radius size. Next assign the angle of the radius, by pressing Tab or Forward Slash ( / ) and typing in the angle of the radius line. Press Enter to create the parent circle.
Step Two: Type in a number to represent the arc distance or press Tab or Forward Slash ( / ) to type in the angle the arc should travel around the circle. Press Enter to create the Arc.
Outline Tool
The Outline Tool is for creating new shapes which match the contour of existing shapes. This tool operates in three steps and exhibits different behavior in each step.

Step One: With the Outline Tool active, left-click once to select an existing shape that needs to be outlined or traced.
Step Two: Type in a number to represent the offset distance. Enter a positive number to offset outside the shape or enter a negative number to offset inside the shape. A line will be drawn perpendicular from the parent shape to the prospective outline indicating the distance between the two. Move your cursor to where the outline should begin and Press Enter to set the outline.
Step Three: Type in a number to represent the distance the outline should travel around the parent shape. Press Enter to draw the outline.
Rotate Tool
The Rotate Tool allows shapes and library items to be rotated.

With the Rotate Tool active, left-click once to select an object and then type in the angle to represent the degree of rotation you desire.
Scale Tool
The Scale Tool allows the size of objects to be changed. With the Scale Tool active, left-click once to select an object and then type in how many times smaller or larger you would like the object to be.

Note: Typing in 0.5 will reduce the object by half and typing in 2 will double the size.
Measure Tool
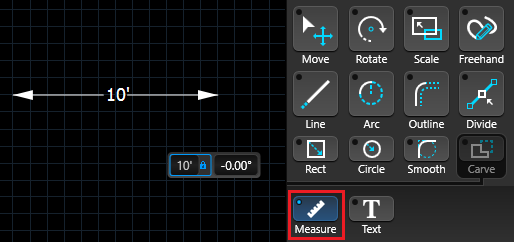
The Tape Measure is for marking arbitrary lengths which are not indicated automatically by the program, such as the distance between two shapes.
With the Measure Guide active, position the cursor in the viewport and single-click the left mouse button to mark the beginning of the measurement.

Type in a number to represent the distance. Next assign the angle of the measurement, by pressing Tab or Forward Slash ( / ) and typing in the angle. Press Enter to create the tape measure.
Smooth Tool
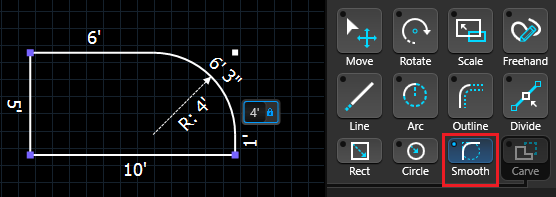
The Smooth Tool converts hard corners into arcs.

With the Smooth Tool active, left-click once on a point between two lines and then type in the radius value of the new arc.
Note: If the value you type-in is too large, the program will assign the maximum radius value possible.
Assign the Angle Measurement
Angle Degrees:
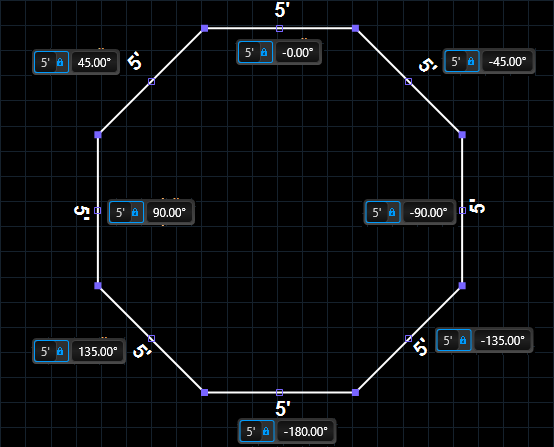
90°: Line or arc will go straight up
45°: Line or arc will go 45° to the upper right
0°: Line or arc will go straight to the right
– 45°: Line or arc will go 45° to the lower right
– 90°: Line or arc will go straight down
– 45°: Line or arc will go 135° to the lower left
180°: Line or arc will go straight to the left
135°: Line or arc will go 135° to the upper left
Draw an 8 or 12 Sided Shape in Equal Lengths
Here is how we created a 5 ft. octagon with type in measurements.
![]()
