This is the only stage where incomplete shapes will show up in 3D.
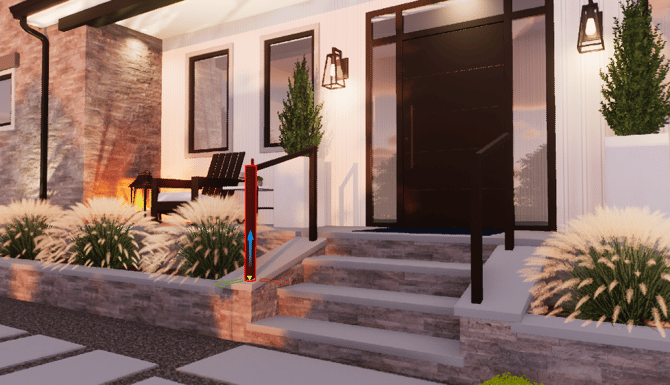
Every line or arc segment drawn in this stage will appear in 3D as a Wall, Fence or Rail and automatically step up sloping hills, follow staircases, and border balconies.
Wall, Fence and Railing Presets
In the Library, you can quickly apply preset styles for many popular wall, fence, and railing designs.
The Library Tab is located on the left side of the Viewport—single-click to expand it.
- Click the Walls, Fences and Railings category to expand or collapse it.
- Click the box next to a preset name to select it; a preview appears to the right.
- To apply the selected preset to your wall, fence, or railing, click Insert One, or double-click the preset name or preview image.

Save New Presets
You can save your custom presets to the library for future use.
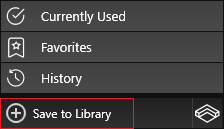
The Save to Library button located at the bottom of the Library allows you to save your custom fence, wall and railing presets.
Wall – Stage Options
Pillars
A vertical element set in the ground as a supporting part of the wall.

Pillars: Toggle to add or remove Pillars to the selected wall. By default, the pillars are square, but you can also choose the round option.
Width: This control will set the width of the pillars.
Height: This control will set the height of the pillars.
Spacing: This control will set the distance between the pillars on the wall.
Cap Style: This button will open the library to Pillar Caps. To apply a new Pillar Cap, double click the name or preview picture. To remove the Pillar Cap, press the “X” button.
Remove by House: Check to remove the pillars next to the house. By default, pillars are placed next to the house. Click this option to automatically remove any pillars that intersect with the house walls.
Wall
 Height: This control will set the height of the wall.
Width: This control will set the width of the wall. The line you draw is the center of the wall and the width is offset evenly on both sides.
Line: This setting controls where the drawn line is displayed left, center or right.
Wall Cap
An element added to provide a protective top surface for any wall.
 Wall Cap: Toggle to add or remove wall cap to the selected wall.
Width: This control will set the width of the wall cap.
Style: This button will open the library to Wall Cap Profiles. To apply a new wall cap, left click the Insert One button or double left click on the Wall Cap Profile name or preview picture.
You can also create your own Wall Cap Styles. First draw the new profile in the Custom Shapes Stage and then save it to the Wall Cap Profile Category in the Library.
The button located at the bottom of the Library allow you to Save your custom Wall Cap to the Library. To remove the Wall Cap, press the “X” button.
Retaining Walls
Create retaining walls and adjust terrain to create raised wall tiers.
Fence – Stage Options
Posts
A vertical element set in the ground as a supporting part of the fence or railing.
 Posts: Toggle to add or remove posts to the selected fence or railing. By default, the posts are square, but you can also choose the round option.
Height: This control will set the height of the posts.
Width: This control will set the width of the posts.
Spacing: This control will set the distance between the posts on the fence.
Cap Style: This button will open the library to Caps. To apply a new Post Cap, double click the name or preview picture.
Skirt Style: This button will open the library to Skirts. To apply a new Post Skirt, double click the name or preview picture. To remove the Post Cap/Skirt, press the “X”.
Remove by House: Check to remove the posts next to the house. By default, posts are placed next to the house. Click this option to automatically remove any posts that intersect with the house walls.
Boards
A vertical element placed between the posts and attached to the rails.
 Boards: Toggle to add or remove boards to the selected fence.
Flat Board Tops: By default, the top of the boards are flat. Uncheck this option to create pointed top boards.
Height: This control will set the height of the boards.
Width: This control will set the width of the boards.
Length: This control will set the thickness of the boards.
Spacing: This control will set the spacing between the boards on the fence.
Elevation: This control will set the board elevation off the ground. Elevation represents the distance between the board and the ground.
Position: Here you can select the board position from the drop-down menu. You can choose from Front, Back, Center and Shadowbox.
Rails
A horizontal support element to which the fence boards are attached. Rails can be adjusted individually or uniformly as a group.
 Rails: Toggle to add or completely remove rails on the selected fence.
Add Rail: This button will add an additional rail to your fence. The new rail will automatically appear at the bottom of the fence on the ground. To adjust its appearance, double left click the new rail to select it.
To remove an individual rail, double left click on the rail and press the Delete button.
Height: This control will set the width of the rail, measuring top to bottom.
Width: This control will set the thickness of the rail, measuring side to side. Note: When the Lock is ON, Width updates proportionately with Height.
Offset: This control will set the spacing between the rails on the fence. Note: When an Individual Rail is selected, this control will change to Rail Elevation.
Elevation: This control lets you set the elevation of an individual rail manually. You can also adjust it in 3D by selecting the rail and moving it with the 3D gizmo. Elevation is the rail’s position, measured as the distance between the rail and the ground.
Position: Here you can select the rail position from the drop-down menu. You can choose from Center, Front, or Back.
Profile: This button will open the library to Rail Profiles. To apply a new Rail Profile, left click the Insert One button or double left click on the Rail Profile name or preview picture.
You can also create your own Rail Profile Styles. First draw the new profile in the Custom Shapes Stage and then save it to the Rail Profiles Category in the Library.
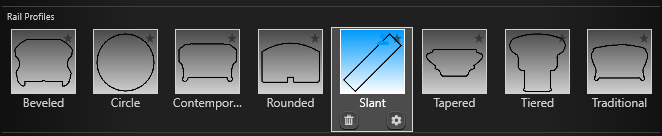
The button located at the bottom of the Library allow you to Save your custom rail profile to the Library. To remove the Rail Profile, press the “X” button.
Follow Slope: Check to have the rail follow the slope.
Fence Install Style
Here you can select the fence style from the drop-down menu.
 Sloped: The fence will run parallel to the slope
Stepped: The fence will gradually step up the slope so that each section is the same length and the rails are level instead of parallel to the slope.
Wall Base: The fence will have a wall at the base.
Railing – Stage Options
Posts
A vertical element set in the ground as a supporting part of the fence or railing.
 Posts: Toggle to add or remove posts to the selected fence or railing. By default, the posts are square, but you can also choose the round option.
Height: This control will set the height of the posts.
Width: This control will set the width of the posts.
Spacing: This control will set the distance between the posts on the fence.
Cap Style: This button will open the library to Caps. To apply a new Post Cap, double click the name or preview picture.
Skirt Style: This button will open the library to Skirts. To apply a new Post Skirt, double click the name or preview picture. To remove the Post Cap/Skirt, press the “X”.
Remove by House: Check to remove the posts next to the house. By default, posts are placed next to the house. Click this option to automatically remove any posts that intersect with the house walls.
Balusters
A vertical element placed between the posts and attached to the rails.
 Balusters: Toggle to add or remove boards to the selected railing.
Flat Baluster Tops: By default, the top of the boards are flat. Uncheck this option to create pointed top boards.
Height: This control will set the height of the boards.
Width: This control will set the width of the boards.
Length: This control will set the thickness of the boards.
Spacing: This control will set the spacing between the boards.
Elevation: This control sets how high the boards are raised above the ground. Elevation is the distance between the board and the ground.
Position: Here you can select the board position from the drop-down menu. You can choose from Center, Front, Back, and Shadowbox.
Rails
A horizontal support element to which the railing balusters are attached. Rails can be adjusted individually or uniformly as a group.
 Rails: Toggle to add or completely remove rails on the selected fence.
Add Rail: This button will add an additional rail to your fence. The new rail will automatically appear at the bottom of the fence on the ground. To adjust its appearance, double left click the new rail to select it.
To remove an individual rail, double left click on the rail and press the Delete button.
Height: This control will set the width of the rail, measuring top to bottom.
Width: This control will set the thickness of the rail, measuring side to side. Note: When the Lock is ON, Width updates proportionately with Height.
Offset: This control will set the spacing between the rails on the fence. Note: When an Individual Rail is selected, this control will change to Rail Elevation.
Elevation: This control lets you set the elevation of an individual rail manually.
You can also adjust it in 3D by selecting the rail and moving it with the 3D gizmo. Elevation is the rail’s position, measured as the distance between the rail and the ground.
Position: Here you can select the rail position from the drop-down menu. You can choose from Center, Front, or Back.
Profile: This button will open the library to Rail Profiles. To apply a new Rail Profile, left click the Insert One button or double left click on the Rail Profile name or preview picture.
You can also create your own Rail Profile Styles. First draw the new profile in the Custom Shapes Stage and then save it to the Rail Profiles Category in the Library.
The button located at the bottom of the Library allow you to Save your custom rail profile to the Library. To remove the Rail Profile, press the “X” button.
Follow Slope: Check to have the rail follow the slope.
Drink Rail: Toggle to add a drink rail on the selected fence.
Height: This control will set the width of the drink rail, measuring top to bottom.
Width: This control will set the thickness of the drink rail, measuring side to side.
Fence & Railing Install Style
Here you can select the fence style from the drop-down menu.
Sloped: The fence will run parallel to the slope
Stepped: The fence will gradually step up the slope so that each section is the same length and the rails are level instead of parallel to the slope.
Wall Base: The fence will have a wall at the base.
Generate Railing on Shape
To automatically add a railing to a shape, select a Hardscape, Wood Deck or Custom Shape.

Next, left-click the Generate Railing on Shape button to place a railing on the selected shape.
The railing will automatically be offset 4 inches inside the edge and will wrap completely around the shape, following any attached staircases.
After the railing is generated, you can customize it using the Rails Options or apply a Rail Preset from the Library.
Link To: Link the railing to another shape. Railing created with the Generate Railing tool will automatically elevate on top of and link to the shape.
Once shapes are Linked they move, scale and rotate together as one shape.

To change the linked shape, single-click the Link To icon and select the new desired shape in the viewport.
Elevation
The elevation of shapes drawn in the Walls, Fences and Railings Stage can be set in the Panel under Object Settings.
 Auto Elevation: With this box checked, shapes drawn in this stage will automatically follow the elevation of the terrain, houses, custom shapes, decks and staircases.
 Elevation Box: With the box unchecked, you may manually enter an elevation into the Elevation Box.
This allows you to create balcony railing, staircase railing, house trim, and other elements.
When you move a wall, fence or railing in 3D with the gizmo, this option is automatically selected.
Manually Adjust Posts/Pillars
In 3D, double click on a Post or Pillar to select it. The Elevation of the selected post/pillar can then be adjusted by using the 3D Gizmo or typing an elevation in the panel.