🪟 Windows
Frame your client’s view of their pool and landscaping quickly and easily with adjustable controls to create spectacular custom windows.
Click the Insert Window button to insert a window.

When you move your cursor to the viewport in 2D and 3D, the Window will follow your mouse until you left-click to place it.
Note: If you move your mouse close to an existing house shape, the window will snap into the proper position.
Once placed, you can customize details, including type, size, and rotation.
To customize the window, double-click each part of the selected window or click directly on the Interactive Window in the Panel.
 As you double click on each section, the Panel updates to show you the options available.
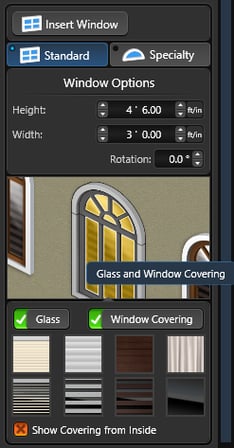
Window Type and Size:
Window Type: Select Standard or Specialty
Height: Set the height of the selected window.
Width: Set the width of the selected window.
Rotation: Set the rotation of the selected window.
Glass: Toggle to add or remove glass from the selected window.
Window Covering: Toggle to add or remove a window covering to selected window. Options are Curtains, Blinds, Shutters, and Tinted Glass.
Show Covering from Inside: Toggle to add or remove window covering from inside the house.
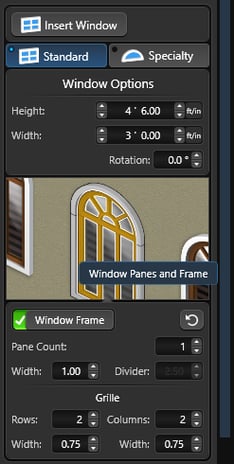
Window Panes and Frame:
Window Frame: Toggle to add or remove the frame from selected window.
Reset: Restore window frame to default settings.
Pane Count: Adjust the number of panes for the selected window.
Width: Set the width of the window frame.
Divider: Set the width of the divider between panes.
Grille
Rows / Columns: Adjust the number of rows and columns of the grille for the selected window.
Width: Set the row/column width of the grille row for the selected window.
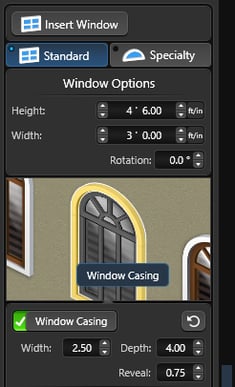
Window Casing:
Window Casing: Toggle to add or remove casing from selected window.
Reset: Restore window casing to default settings.
Width: Set the width of the window casing.
Depth: Set the thickness of the window casing.
Reveal: The window reveal is the area surrounding your window on both the interior and exterior wall. It's the area perpendicular to the window. This sets the depth of the inset into the exterior wall.
Additional Options under Window Casing:
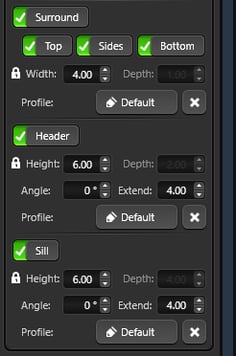
Surround: Toggle to add or remove surround from selected window
Top / Sides / Bottom: Toggle to add or remove surround from top, sides or bottom of selected window
Width: Set the width of the surround
Depth: Set the depth of the surround
Note: When the Lock is ON, Depth updates proportionately with Width.
When you press the Lock Icon next to Depth it will "unlock" the Depth field and allow you to type in a value.
Profile: This button will open the library to Surround Profiles. To apply a profile, left click the Insert button or double left click on the Profile name or preview picture.
To remove the profile, press the “X” button.
Header: Toggle to add or remove header from selected window
Height: Set the height of the header
Depth: Set the depth of the header. Note: When the Lock is ON, Depth updates proportionately with Height.
Angle: This control allows the angle of the header edge to be adjusted from 0° to 80°
Extend Width: This control allows the header to be extended beyond the casing
Profile: This button will open the library to Header Profiles. To apply a profile, left click the Insert button or double left click on the Profile name or preview picture. To remove the profile, press the “X” button.
Sill: Toggle to add or remove sill from selected window
Height: Set the height of the sill
Depth: Set the depth of the sill. Note: When the Lock is ON, Depth updates proportionately with Height.
Angle: This control allows the angle of the sill edge to be adjusted from 0° to 80°
Extend Width: This control allows the sill to be extended beyond the casing
Profile: This button will open the library to Sill Profiles. To apply a profile, left click the Insert button or double left click on the Profile name or preview picture. To remove the profile, press the “X” button.
TIP: Any profile found in the Design Library under Windows, can we applied to the Surround, Header and Sill.
Add Arch to Top of Rectangle Window:
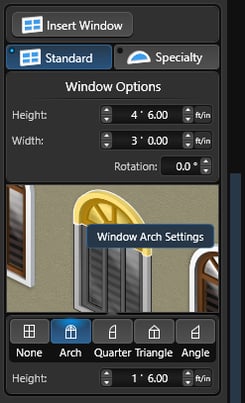 Arch: Select this option to add an arch to the top of the Rectangle window
Quarter: Select this option to add an quarter arch to the top of the Rectangle window
Triangle: Select this option to add a triangle to the top of the Rectangle window
Angle: Select this option to add an angle to the top of the Rectangle window
Height: Adjust the height and position of the arch/angle.
Arch Settings under Window Frame:
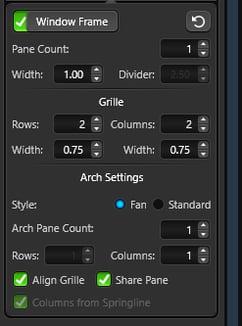
Style: Choose between fan and standard style for framing settings
Flip Arch/Angle: Select this option to change the direction of the Quarter Arch or Angle.
Arc Pane Count: Adjust the number of panes in the arch for the selected window.
Rows / Columns: Adjust the number of rows and columns of the grille for the arch section of the selected window.
Align Grid: Check to align the arch grille with the rectangle grille. Note: When active, you cannot adjust Arch rows separately.
Share Pane: Check to have the arch and rectangle share a single pane with no divider.
Column from Springline: Check to connect arch columns to bottom of pane. When off, columns start from first row of grille.
Specialty Window Options
Specialty windows are great to highlight a particular design feature of a home. Create the specialty windows you need with the controls found under Arch, Triangle and Custom Triangle.
Arch
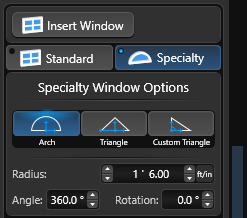
Radius: Set the radius size of the selected window.
Angle: Set the angle of the selected window.
Rotation: Set the rotation of the selected window.
Triangle
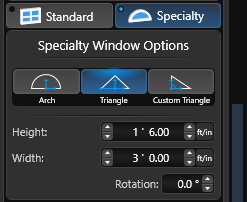
Height: Set the height of the selected window.
Width: Set the width of the selected window.
Rotation: Set the rotation of the selected window.
Custom Triangle
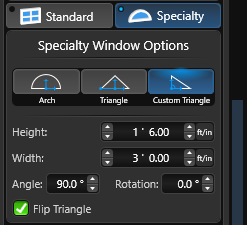
Height: Set the height of the selected window.
Width: Set the width of the selected window.
Angle: Set the angle of the selected window.
Rotation: Set the rotation of the selected window.
Flip Triangle: Change the direction of the selected window.
Window Settings in Presentation
Windows Lit at Night: Enabling this option will illuminate all the windows at night, creating the illusion that there are lights on inside the house. This setting is designed to enhance the natural look of the scene.


Window Light Intensity: You can control the brightness of the window lights to achieve the desired effect.
Window Opacity: This control allows you to determine how reflective the windows on a house shape appear. The opacity setting also directly affects the window light intensity, meaning that the higher the opacity, the greater the intensity of the window lights.

Add Shutters to Your Windows
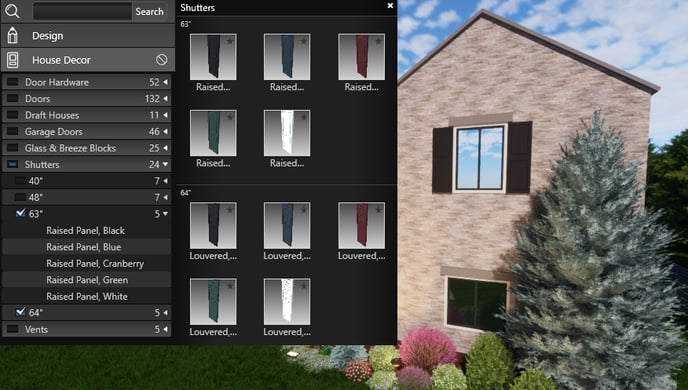
- Insert a Window.
- Set the Height and Width of the size you would like the shutter.
- Turn OFF Glass.
- Turn ON Shutter Window Covering and select the Closed Shutter Option.
- Turn OFF Window Frame.
- Head to the Materials Stage. Scale the size of the closed shutter material and apply any color to the frame and shutter.
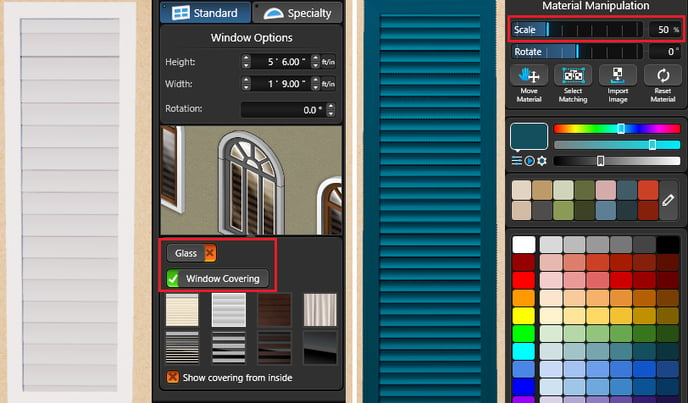
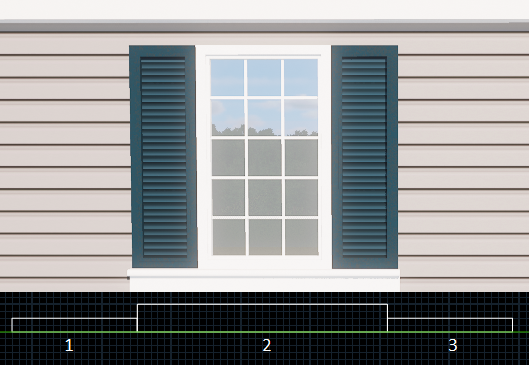
In the example below we added 3 windows.
2 set to shutters with the steps above and the center window as a regular window with glass.
