Features of Yard Accessories
All yard accessories are fully rendered in 3D to create a visually stunning presentation of your project.
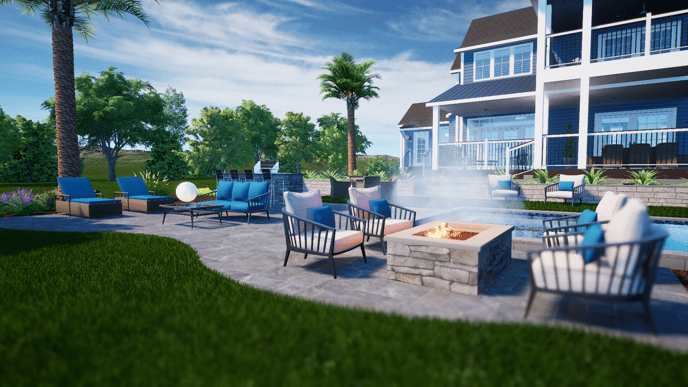
More than 3000 3D Items for your Project: Vip3D offers a wide selection of library items for use in your design. Yard Accessories include large structural items such as gazebos, patio covers and playsets as well as small accessories such as plates, silverware, wine bottles, and ice buckets. The library has a full range of items to complete your design, including equipment, furniture, rockwork, fountains, lighting elements and more. There are even people and animals to position in the design, including animated dogs and fish that swim in the water. There are also many items from leading manufacturers and vendors.
Animations: Some items in the library are animated. Animated items are clearly labeled and are located in animated groups in the library. In the 3D view and in the Presentation mode, animated items will move in a set pattern. For example, animated fish swim in the water while animated ceiling fans spin around.
You can turn off the animation for a selected item by using the Play/Pause button located under the Object Tab in the Panel. In the Presentation mode you can stop all animations by pressing the Enter key or by pressing the Play/Pause button in the Presentation menu. You can default item animations on or off for new items you insert with the Default New Item Animations On checkbox located in the Library Tab of the Configuration Menu.
Yard Accessories in the Library
All yard accessories are located under the Items Tab in the library.
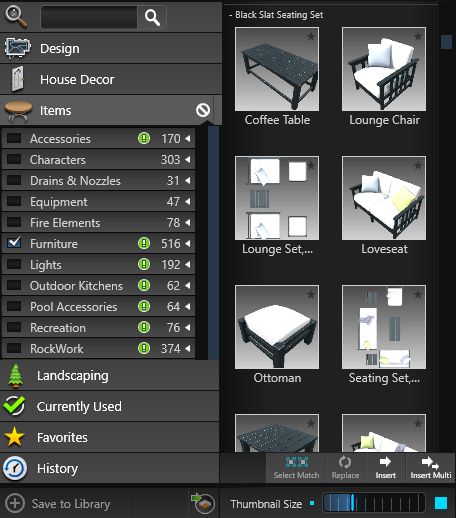
List View: The List View is sorted under Category bars which can be collapsed and expanded as necessary. The number displayed to the right represents the number of options available in that Category.
Left clicking on a Category name will expand or collapse that Category and display the Types available. Left clicking on the box next to the Category name will add a check mark and a preview image of each plant/tree in that category will appear to the right of the list in the Thumbnails Panel.
To clear a selected an item, left click on the check mark next to the Category or Type name to remove the check mark. To deselect all items you have selected, left click the Deselect Button. This will remove the check marks from anything you have selected.
Items may be inserted by double left clicking on the name or preview picture or using the Insert One or Insert buttons at the bottom of the Thumbnails Panel.
Thumbnails Panel: In the Thumbnails Panel you will see a preview of items that have a check mark next to their name in the List View. Items are sorted by Categories, the Types are listed below the Category.
You have the ability to resize the width of the Thumbnails Panel by hovering you cursor on the edge of the panel until the cursor becomes a double arrow, hold down the left mouse button to resize the panel. You also have the ability to scale the size of the thumbnails by using the Thumbnail Slider at the bottom of the Thumbnails Panel.
Replace Button: This button replaces the item you currently have selected in the design with the item you have selected in the library. This command works well when combined with Select Matching found under the Object Tab in the Panel. For example, combining both commands allows you to quickly exchange all the iron dining chairs in your design for wood dining chairs.
Insert: This button will insert the currently selected item into the project one time.
Insert Multi Button: This button will insert the currently selected item into the project. It allows you to insert as many copies of the item as you wish. Each time you left click, the currently selected item will be inserted. To stop inserting copies of the item, right click or switch to the Move tool to reset your cursor. Insert is perfect for adding multiple items to the design.
Object Settings

Auto Elevation: With this box checked, a selected item will automatically snap to the surface underneath it. This means that items will be set to the elevation of the ground or if placed on a surface like a house piece, the height of the house piece. The item will even snap to a surface that has a negative height such as a sunken deck or planter. All library items by default are set to Auto Elevation when you insert them.
Elevation Box: You can manually enter an elevation for a selected item here. Moving a item in 3D with the 3D gizmo will also set a manual elevation.
Show Landscaping as Symbols: This check box allows you to show a selected item as a 2D symbol instead of as a 3D marker in the 2D view. This allows you to change how a item you have already placed into your design appears. Uncheck the box to show the selected landscaping as a 3D marker again.
New Variation: This button will change the variation of a selected plant or tree. This also allows you to change the variation of a plant or tree you have already placed in your design.
Play/Pause: This button allows you to turn animations on and off for a selected item. Pressing Play will turn on animations for a selected item while pressing Pause will stop animations. With animations on, the item will move according to its set animation.
Turn Light On During Day: Checking this box will turn lights from the library on during the day. Unchecking the box will turn the lights from the library off during the day.
To add more light to your project, insert Staging Lights. Both the Point Light and Spot Light display markers while designing, but are invisible in presentation mode, screenshots and videos.
Note: Use the “Show Staging Light Symbol” option under Hide/Unhide to hide both the 2D and 3D symbol for Staging Lights.
Object Modification
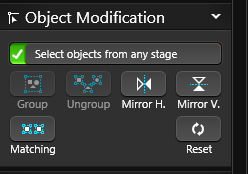 Matching: This button will automatically select every item in the design matching the currently selected item. For example, this allows you to select every landscape light inserted in the design
Reset Object: This button allows you to reset a selected item that has been rotated. The item will reset to its default from the library.
Additional Options
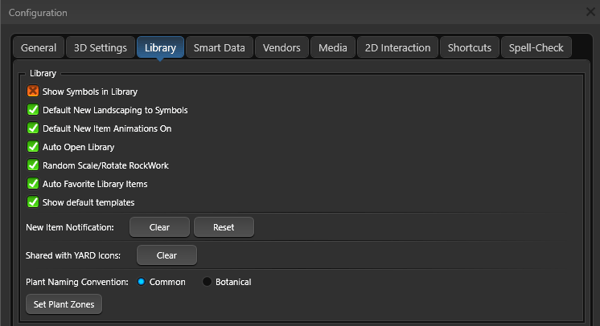
Show Symbols in Library: Check this box to set all items in the library to display as symbols. With this option turned on, the symbol preview of each item will appear in the Thumbnails Panel of the library.
Default New Landscaping to Symbols: Plants and trees may be shown in the 2D viewport either as 2D symbols or as 3D markers. Check this box to have new plants and trees insert as 2D symbols or uncheck the box to have new plants and trees insert as 3D markers.
Default New Item Animations On: Check this box to default animations on for items inserted from the library. This controls the animations for items located under the Items Tab in the library. If you do not wish items to animate, uncheck this box to default animations to off.
Animations for items you have already inserted may be turned on/off by using the Play/Pause button located under the Object Tab in the Panel.
Auto Open Library: Check this box to cause the library to automatically expand when going to a stage that requires the library. This would include stages like Plants and Trees, Materials, and Yard Accessories.
Random Scale/Rotate Rockwork: Check this box to automatically randomize the rotation and scale of the rockwork that you insert. Each time you insert a rock, it will have a different rotation and appearance than the previously inserted rock.
Auto Favorite Library Items: Check this box to automatically add the items you use the most to your Favorites tab of the Library. Once an item is inserted 25 times, a blue star will appear in the item preview thumbnail. Uncheck the blue star to remove the item from your auto favorites.
Show Default Templates: Check this box to automatically show the default templates included with the software in the Library.
New Item Notifications: Press the Clear button to remove the New Item exclamation points in the Library. Press the Reset button to restore the New Item list from the most recent update.
Creating New Library Objects with Save to Library
Save to Library allows you to create a unique entry in the Library with a custom name and symbol.
For example, a light in the library may look just like one you install, but you call it a different name. You can make a copy of the original model, and save it with a unique name and symbol.
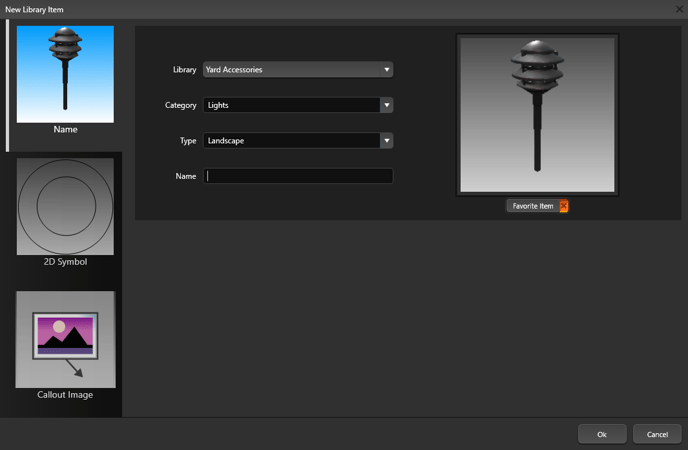
In the Library, you’ll see both the original and the copy, which means you can edit both individually.
Select the new item in the library, press the Edit Gear button and the Edit Object box will come up if you would like to change any settings.
Searching for Yard Accessories in the Library
The Search Tab allows you to search for items in the Library by name. This allows you to find the item you are looking for by searching under its name.
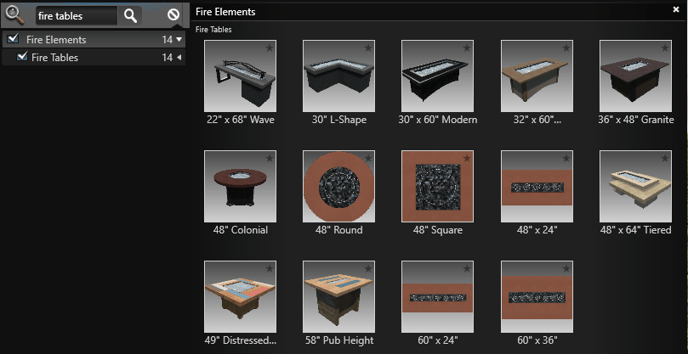 To search for a item, simply type the name of the item into the Search bar and press the magnifying glass. The results of the search will appear below.
Single words or groups of words may be entered into the Search bar. You may type in a specific item name such as Gas Meter or type in a category name such as Equipment. The search feature will search item names, categories and types.
Items may be inserted by double left clicking on the name or preview picture or using the Insert One or Insert buttons at the bottom of the Thumbnails.
Moving Yard Accessories in 3D
Moving in 3D: Items can be moved in 3D by using the 3D gizmo. The blue arrow will elevate the item up and down while the red and green arrows will move it left to right and back and forth. You may move a single item, multiple items, or groups of items.
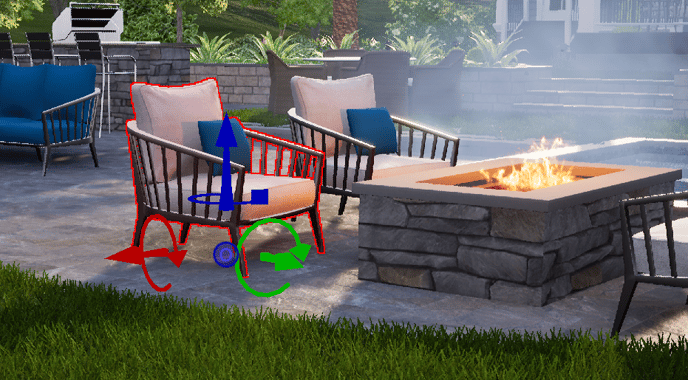
Rotating in 3D: Items can be rotated in 3D by using the 3D gizmo. This allows you to not only rotate the item but also tilt the item at an angle. You can tilt items to properly place them on elevated terrain such as hills. The blue rotate arrow will rotate the item while the red and green arrows will tilt it. Items will rotate according to the Snaps and Constraints you have set.
Lights
Lights in the Library: Lights in the Library are located in the Lights Category. This category includes interior and exterior lights as well as fixtures such as ceiling fans. Specialized lights such as pool lights are also found in this category.
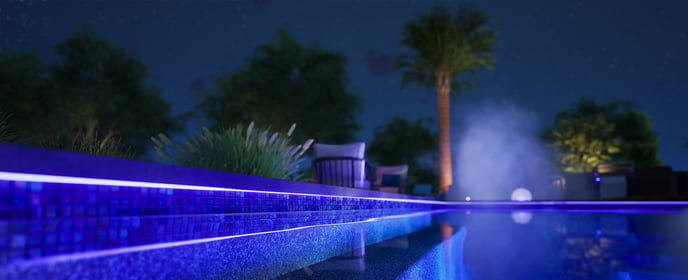
Illumination of Lights: Lights will actually create illumination and light up the design. Lights will only turn on when the time of day is set to night unless you have the Turn Light on at Day option selected. Lights will illuminate the design in the 3D view and in Presentation.
Rockwork
Rockwork in the Library: Rockwork in the Library is located in the Rockwork Category. This category includes different types of individual rocks, boulders and stones as well as rock slides and waterfalls.
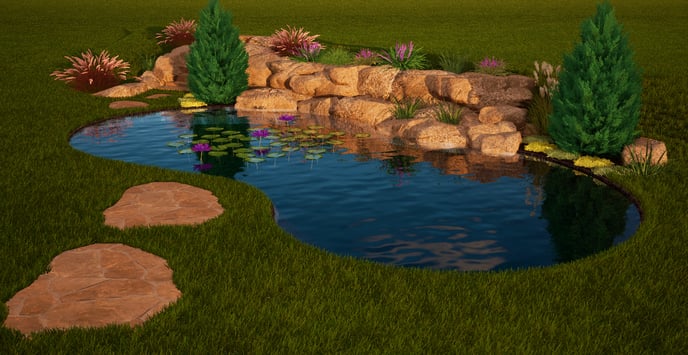
Rock Waterfalls and Slides: Rock waterfalls and slides are used to add rock water features to your design. Some of the slides and waterfalls are premade with animated water flowing over the rocks. Other rock items are designed so that water features may be added from the library.
To learn how to create a custom rock waterfall, watch our video:
Visual Features
Visual Features can be found in the Library under Fire Elements and Water Elements. These categories contains fire, water features and water features with light.
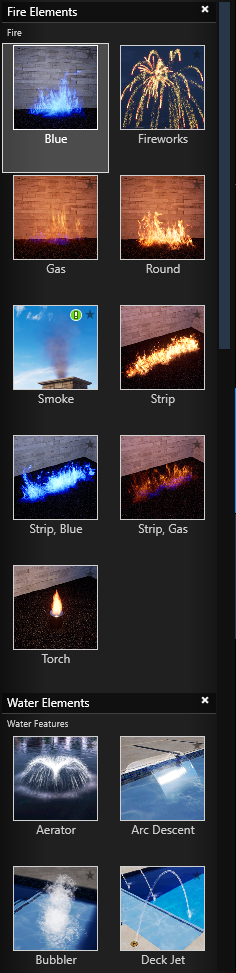 Most of the water effects such as Arc, Rain, Water Descents and Spillovers will automatically snap to the edge of the water feature as you insert them. Each of the effects will also conform to the shape of the water feature, bending around corners and curving around arcs. As you increase the length of these water effects they will continue to conform to the shape of the water feature.
Some water effects may also be placed on other objects, such as house pieces and custom shapes, but they will not conform to the shape of those objects and will remain straight.
Each visual effect has its own unique options. When you select an effect from the library, you will see the specific options available for that effect under the Object Tab in the Panel.
You can change the settings for any effect you have already inserted by selecting the effect in your design and changing the options in the menu.
Visual Feature Options
Aerator Height: This box controls the distance that the water sprays up from the aerator.
Aerator Radius: This box controls the radius of the plume of water from the aerator.
Angle: This control sets the selected water effect to a specific angle.
Bubbler Height: This box controls the distance that water sprays up from the bubbler.
Bubbler Radius: This box controls the distance the water spreads out from the bubbler as it falls down.
Deck Jet Distance: This box allows you to set the distance between the start and end points of the deck jet (or Laminar). The circular dotted line represents the maximum distance of the deck jet.
Descent Length: This control allows you to set the length of a descent water effect, adjusting how wide or narrow it is.
Edge Angle: This control allows you to set the slope of the dam wall for a spillover or edge water effect.
Edge Length: This control allows you to set the length of an edge water effect, adjusting how wide or narrow it is.
Fire Height: This control adjusts the height of the fire effect.
Fire Radius: This control adjusts the radius of the base of the fire effect.
Height: This control sets the selected water effect to reach a specific height.
Pressure: This slider adjusts the force at which water flows from a descent effect. Increasing the pressure will increase the distance the water flows out from the effect, while lowering the pressure will decrease the distance the water flows out from the effect, eventually reversing it.
Reverse Direction: This check box causes the water flow to reverse direction. This is helpful if a water effect is facing the wrong direction.
Stop at Origin: This check box controls the flow of water. When the box is checked the water flow will fall and stop at the same height as where it starts, allowing for open space underneath. Unchecked, the water will fall until it hits the ground.
Stop At: This check box controls the flow of water. When the box is checked the water flow will stop at the set elevation, such as splashing onto a solid surface. Unchecked, the water will fall until it hits the ground.
Taper: This slider adjusts the angle at which the water tapers in or out from the water source.
Travel Distance: This control allows you to create a flat plane of water, before the water spills down. Perfect for design elements such as scuppers.
Volume: This slider controls the level of sound produced by the visual feature.
Water Flow: This check box turns the water flow of a water effect on or off. This allows you to show the dam wall clear of the water from the effect.
Animated Items
 Animated Items in the Library: Some items in the library are animated. These items are easy to identify because they are located in animated groups. For example, the animated people are located in the Characters category under the Animated Adults or Animated Children. Animated items insert exactly the same as regular items.
Movement of Animated Items: Each animated item has unique movement depending on the type of item. For example, animated animals will walk or swim while animated fixtures such as ceiling fans will rotate.
Items that move, such as walking or swimming animals, move in a set pattern starting from the point where they are placed in the design. When placing animated items it is important to understand that animated items will move in their set pattern regardless of other objects in the design. For example, an animated koi fish that swims in a circle will swim in the same size circle regardless of the size of the pond the koi fish is placed in. If the animated koi fish is not placed properly, it will swim through the wall of the pond and into the ground to complete the set circle it swims in. When using animated items, be aware of the pattern of their movement and place them properly within the area you wish them to be animated.
It is also important to note that Auto Elevation will snap animated items to the bottom of a body of water like a pond, not to the surface of the water. When placing items such as swimming animated ducks, you will want to manually elevate them to the surface of the water.
Animated Items in 3D: Animated items will animate in the 3D view. You can turn off the animation of a selected item by pressing the Play/Pause button found under the Object Tab in the Panel. Pause will stop the animations while Play will turn them back on. The Play/Pause button may be used on a selected animated item in both the 2D and 3D views. You can set the default for new animated items you insert with the Default New Item Animations On checkbox located in the Library Tab of the Configuration Menu. Items whose animations are turned off here will not be animated in the Presentation Mode. You must turn on the animations for the item here before it will be animated in the Presentation mode.
Animated Items in Presentation: Animated items will animate in the Presentation mode. You can turn animations on and off for all animated items in the Presentation Mode by pressing the Enter key on your keyboard or using the Play/Pause button in the Presentation Mode Menu. This will start or stop animations for every animated item as well as all animated plants and trees in the design. Items whose animations were turned off in the 2D or 3D view will not be animated in Presentation. You must go back and turn the animations back on before the items will be animated.
Animated Items and Computer Performance: Animated items may affect your computer performance. Each animated item increases the demand on your computer hardware. If your computer performance slows down, you may need to reduce the number of animated items in your design.