Library Overview
The Library Tab is located on the left side of the Viewport. Single-click the left mouse button to expand the library. It contains templates, items, plants and trees, and vendor products.
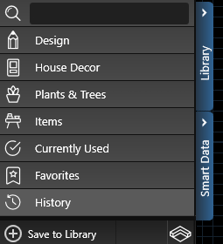
 The Library is broken into Seven Tabs: Design, House Decor, Items, Landscaping, Currently Used, Favorites, and History.
There are two ways to view the library, List View and the Thumbnails Panel.
List View
The List View is sorted under Category bars which can be collapsed and expanded as necessary. The number displayed to the right represents the number of options available in that Category.
 Left clicking on a Category name will expand or collapse that Category and display the Types available. Left clicking on the box next to the Category name will add a check mark and a preview image of each item in that category will appear to the right of the list in the Thumbnails Panel.
To clear a selected item, left click on the check mark next to the Category or Type name to remove the check mark. To deselect all items you have selected, left click the Deselect Button. This will remove the check marks from anything you have selected.
Items may be inserted by double left clicking on the name or preview picture or using the Insert One or Insert buttons at the bottom of the Thumbnails Panel.
Thumbnails Panel
In the Thumbnails Panel you will see a preview of items that have a check mark next to their name in the List View. Items are sorted by Categories, the Types are listed below the Category.
 Panel Size: You have the ability to resize the width of the Thumbnails Panel by hovering your cursor on the edge of the panel. When the cursor becomes a double arrow, hold down the left mouse button to resize the panel.
Thumbnail Size: You have the ability to scale the size of the thumbnails by using the Thumbnail Size Slider at the bottom of the Thumbnails Panel.
Select Matching Button: This button will select any object in the scene that matches the current Library selection.
Replace Button: This button replaces the item you currently have selected in the design with the item you have selected in the library. This command works well when combined with Select Matching found under the Object Object Modification in the Panel.
For example, combining both commands allows you to quickly exchange all the regular bubblers in your design for LED Bubblers.

Insert Button: This button will insert the currently selected item into the project one time.
Insert Multi Button: This button will insert the currently selected item into the project. It allows you to insert as many copies of the item as you wish. Each time you left click, the currently selected item will be inserted. To stop inserting copies of the item, right click or switch to the Move tool to reset your cursor. Insert Multi is perfect for adding multiple items to the design such as dining chairs or rockwork.
Inserted items will remember the stage they were created in. Therefore a custom shape template inserted into the House Stage will still be a custom shape and not a house piece. Most templates will insert into the project as a group. To Ungroup the template, click the Ungroup button located in the Object Tab in the Panel..
New Items: Library items added in the most recent update to Vip3D. The green exclamation mark, makes it easy to see all the new items and start using them in designs.
Tabs
The Library is broken into Seven Tabs: Design, House Decor, Items, Landscaping, Currently Used, Favorites, and History. Using the Search Bar at the top will search all Tabs for the items you are looking for.

Search Bar: This allows you to search for items in the Library by name. This is the fastest way to find an item and insert it into the design.
Design: This tab contains templates such as houses and custom shapes.
House Decor: This tab contains items to complete the house such as garage doors, vents and door knobs.
Plants & Trees: This tab contains plants and trees for use in landscaping. For more information, see Plants & Items.
Items: This tab contains accessories, equipment, furniture and other items for use in your project. This tab also contains many products from vendors and manufacturers. For more information, see Plants & Items.
Currently Used: This tab displays a list of all the library items currently inserted into the design. This makes it easy to see which items have been inserted into the design and insert additional copies.
Favorites: This tab is a list of items you clicked the Favorite Star in the upper right corner of the preview picture and your Auto-Favorites.
The software adds an item to your auto-favorites once inserted 25 times. Auto-Favorites have a blue star in the preview picture. This makes it easy to find and insert the items you use most often into your designs.
History: This tab displays a list of the last 100 library items you added in projects. This makes it easy to see all the items you recently inserted in designs.
Saving Custom Templates to the Library:
You can save your custom library templates to the library for future use. Templates can include objects that may have been created in different stages. For example water features with landscaping items or many other groups of items may be saved together as a template.
It is recommended to save all custom templates you create to the library. This will allow you to quickly and easily insert your templates in all your future projects.
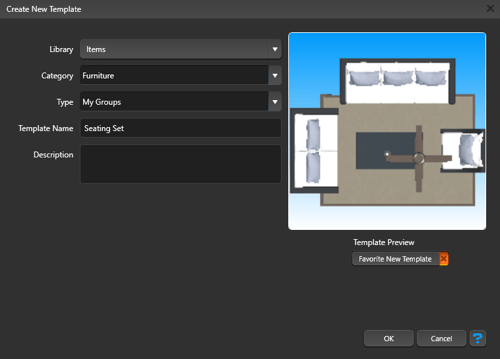
 Save to Library: When you press the Save to Library button, the Create Template box will come up. This box will display a preview image of the template.
You select the Category and Type you would like the template saved to from the drop down lists and give your new template a Name.
To create a new category or type to save the template to, simply type in the new category or type name. Press the Ok button when you are done.

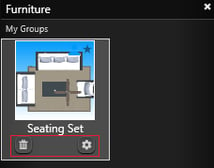
Once a template has been saved, select the Thumbnail in the Library to Delete or Edit the template.
 Trash Can: Press the Trash Can (Delete) to remove the template. NOTE: This will remove the saved template from the library for all projects and cannot be undone.
Gear: Press the Gear (Edit) to bring up the Edit Template box and edit the Category, Type, Name and Description of the custom template.
This allows you to move saved templates between Categories and Types. You can also create new Categories and Types by typing in new category and type names.