The Materials Stage has a unique library different from other phases. The Materials Library contains materials you can apply to surfaces in your design.
The Materials Library Tab is located on the left side of the Viewport. Single-click the left mouse button to expand the library. When you enter the Materials Phase the Materials Library will automatically open.
Materials can only be applied in 3D. You must select the surface before you can apply a material to it.
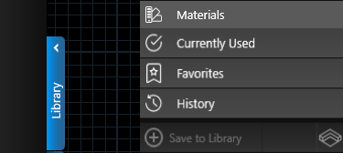
The Library has a Search Bar at top and 4 Tabs: Materials, Currently Used, Favorites, and History.
There are two ways to view the Library, the List View and Thumbnails Panel.
List View
Materials are sorted under Category bars which can be collapsed and expanded as necessary. The number displayed to the right represents the number of material options available in that Category.
To clear a selected material, left click on the Category name. This will remove the check mark. To deselect all materials you have selected, left click the Deselect Button. This will remove the check marks from anything you have selected.
Thumbnails Panel
In Thumbnail View, you’ll see previews for any materials with a check mark next to their name. Materials are organized by Category, with each Category’s Subcategories listed directly beneath it.
 Panel Size: You have the ability to resize the width of the Thumbnails Panel by hovering your cursor on the edge of the panel. When the cursor becomes a double arrow, hold down the left mouse button to resize the panel.
Thumbnail Size: You can adjust the thumbnail size by choosing Small, Medium, or Large icon at the bottom of the Thumbnails Panel.
Clear Thumbnails: To clear a Material, left click on the check mark next to the Category or Sub Category name to remove the check mark.
To deselect all materials you have selected, left click the Deselect Button. This will remove the check marks from anything you have selected.
Matching: With a material selected in the list, this button will select all the surfaces that have the selected material applied. This makes it easy to quickly replace an applied material with a new one on multiple surfaces.
Apply: This button will apply the currently selected material onto the currently selected surface or surfaces in the design. Materials may also be applied by double left clicking on the material name or preview picture.
Material Template Buttons
Create custom materials using the Color Swatches, Sliders, or HSV controls available in the Panel. For more information, see Customize Materials.
 Save to Library: Use the Save button to add any materials you’ve customized to the Materials Library, so you can quickly reuse your custom materials in future designs.
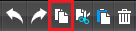
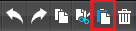
 Delete: The Delete (Trash Can) button will permanently delete a custom material from the library.
Edit: The Edit (Gear) button is used to edit custom materials you have saved to the Materials Library.
Quick Select
Quick Select lets you instantly select every object of a chosen type, so you can apply the same material to all of them at once. Just click the Quick Select button for that object type to highlight all matching objects.

For example, clicking on the Houses button will select all the shapes in the design drawn in the House Stage.
If any of the Quick Selection buttons are grayed out, it means your project does not contain any objects of that type, or you are in the 2D view.
Select Individual Surfaces
Select Surfaces: If you wish to change one individual surface, you may select it by double left clicking directly on it. Selected surfaces will outline in red.
To select more than one surface at a time, hold down the CTRL button on your keyboard and left-click once on each additional surface.
At any time, you can cancel your selection by pressing the Select None button.

Select in 3D:
In the Materials Stage, 3D selection behaves differently than in other phases. Instead of using the 3D gizmo to move objects, you select individual surfaces on shapes and apply materials directly to them.
The selected surface is outlined in red so you can see exactly what is active. Copy and Paste also function differently here: you are copying and pasting materials onto surfaces, not duplicating objects.
Each shape and library item is made up of multiple surfaces. After selecting a shape, double‑click any individual side to apply a unique material to that specific surface.
Select Painted Materials:
You can also select materials that have been painted onto the terrain with the Paint tool. Each painted material acts as its own surface and can be selected by double‑clicking it. When you select any area where that material has been painted, every instance of that painted material on the terrain is selected. If you modify a painted material, every location where it appears on the terrain will update.
Material Tools

Move Material: This button will allow you to pan the selected material. This allows you to adjust and line up materials such as the plank lines in wood materials to appear properly across a surface.
Matching: This button will allow you to select objects with the same material. With a surface selected in the project, clicking on the Select Matching button will select all objects with the same material.
Change: This button will allow you to apply the customizations you have made to one material applied to a selected surface to every other surface that material is applied to in your project.
Create: This button allows you to create custom materials by importing graphics files. For more details, see Create Materials.
Customize Material
Use the controls to refine materials you have already applied in your design. First select the material on the surface, then adjust its appearance with these settings. This is especially helpful when you need patterns to align cleanly across a surface or when you want to match a specific product or style. For more details, see Customize Materials.
 Reset: Use this button to restore any customized material to its original library version. All edits to that material are removed, and every selected instance is reset.
Scale: Use the slider or type in a value and press enter, to scale the pattern of the currently selected material. To scale larger than 200%, type in the value and press enter.
Rotate: Use the slider or type in a value and press enter, to rotate the pattern of the currently selected material.
Specular: Use the slider to add non‑metallic reflections, controlling how shiny or glossy the material appears.
Advanced 🔽
Normal: The Normal texture adds fine surface detail and fakes depth by simulating bumps, scratches, and other small imperfections.
Height: The Height texture adds true depth to a surface, creating details like cracks and bumps. Unlike normal maps, it can actually alter geometry or use parallax occlusion, rather than only simulating lighting on a flat surface.
Roughness: The Roughness texture controls how smooth or matte a material appears. It is a grayscale map where white areas are rough and diffuse, and black areas are smooth and highly reflective.
Metallic: The Metallic texture controls how smooth or matte a material appears. Use the Metallic texture only for true metal materials, such as aluminum, gold, silver, or metal alloys like brass.
Tint Material

Color: The Color Strip allows you to change the color of a selected material applied to a surface in your design. You may left click directly on a color in the strip or use the slider below the strip.
Color Strength: The Color Strength Strip allows you to adjust the intensity of the color of a selected material applied to a surface in your design. This allows you to fine tune a color to perfectly match your project requirements. You may left click directly on the color strength you would like to select or use the slider below the strip.
Brightness: The Brightness Strip allows you to adjust the brightness of a selected material applied to a surface in your design. This will brighten or darken the color of the selected material. You may left click directly on the brightness you would like to select or use the slider below the strip.
Color Swatches
Use swatches to quickly apply a wide range of colors to the material on your selected surface. Just left‑click a swatch to apply its color.
Custom Swatch Colors: Create up to 18 custom swatches to build your own color palette. First, set your color using the sliders, then click the Edit icon (pencil next to the swatches) and choose a swatch to save it. Your saved colors will be available anytime you need them.
Custom Tint for Plant or Material
When you select a plant or material that is supported by the custom tint system, you'll see these options appear directly under the color swatches.
You can customize tile, stone, and brick materials by tinting the tile, brick, grout, and mortar separately. It’s a quick, easy, and endlessly customizable way to achieve stunning results.
This system also makes it effortless to create the exact plants you need. Flowers and leaves can be customized individually, giving you the flexibility to create unique, personalized color combinations that suit your every need.

Default Materials
Showcase materials you know your clients love. In the Materials Stage, you can quickly and easily set your default materials. And once you set your preferred defaults, they’ll remain set automatically in each new design you begin.
To set default materials, simply click the Set Default button. A question mark will appear on your cursor. Double-click on the shape you want to be your default materials for that shape type.

When setting default materials, you will be prompted to confirm your choices for that specific type. For instance, when selecting a house shape, you are setting the default materials for house walls, roofs, windows, gutters/downspouts, and dormers.

As you design, the material of your last-selected shape will automatically be set as the material for the next shape of that type that you add to a project.
To apply all default materials for a specific shape, simply select the shape and click the Apply Default button. This will automatically assign all your preferred materials to that shape type.
3D Grass (Vip3D Exclusive)
Double-click the Grass to select it. With the Grass selected, Turn On 3D Grass in the Panel under Object Settings.

To preview 3D Grass while you design, check the Visible While Designing option. In Design Stages, 3D Grass displays as a limited‑distance preview; it will render in full detail in Photos and Videos.
Search Bar
The Search Bar lets you quickly locate materials in the Library by name, making it fast to find and apply materials in your design. Searches include material names as well as their categories and subcategories.

Search: To find a material, type its name (or a category name) into the Search bar and press Enter. Matching results will appear below. You can search using single words or multiple terms, such as “Travertine Coping” or “Earth.”
Materials Found by the Search: Apply the material by double‑clicking the name or thumbnail, or by clicking the Apply button. Search results are listed alphabetically by material name, and each entry shows its location in the Library. You can add any result to Favorites by clicking the star icon in the upper right corner of its thumbnail.
Materials Tab
 The Materials Tab contains materials which can be applied to surfaces in your design.
This includes materials for use on the ground such as grass, dirt, and sand and materials for structures such as concrete, stone and brick materials. This tab also contains specific materials from vendors and manufacturers.
Materials are sorted under Category bars which can be collapsed and expanded as necessary. Left clicking on a Category name will expand or collapse that Category.
Left clicking on the box next to the Category name will add a check mark and an image of each material will appear to the right of the list in the Thumbnails Panel.
Materials may be selected by left clicking on the material picture or name. The materials may be applied by double left clicking on the picture or name or using the Apply Material button below.
Currently Used Tab
The Currently Used Tab displays a list of all the library materials currently applied to surfaces in the design. This makes it easy to see which materials have been applied to surfaces in the design and apply those materials on more surfaces.

Materials in the Currently Used Tab are organized alphabetically by Category name. This tab includes every material applied to shape surfaces in your project, such as brick, grass, stone, and tile.
Beneath each material, you’ll see the total square footage used in the project.
With a material selected in the list, click the Matching button at the bottom of the Library to highlight every shape or item using that material with a red outline.

Vendor products are also included in this list with the name of the vendor, their website and the specific product name.
As with other materials in the library, materials in the Currently Used Tab may be added to Favorites by clicking the star icon in the upper right corner of its thumbnail.
Favorites Tab
The Favorites Tab allows you to create a list of materials you commonly use for quick access.
Add Materials to Favorites: Any material in the library may be added to this list by clicking the star icon in the upper right corner of the thumbnail preview. Favorites have a yellow star.
Remove Materials from Favorites: When viewing the favorites list under the Favorites Tab you may remove any material by left clicking the star icon in the upper right corner of the thumbnail to remove the item from Favorites.
Auto-Favorites: The software adds a material to your auto-favorites once applied 25 times. Auto-Favorites have a blue star in the preview picture. This makes it easy to find and apply the materials you use most often into your designs.
History Tab
The History Tab displays a list of the last 100 materials you applied in projects. This makes it easy to see all the materials you recently applied in designs.
As with other materials in the library, materials in the History Tab may be added to Favorites by left clicking the star icon in the upper right corner of the thumbnail preview.
Copy and Paste Materials
You can reuse any material already applied in your design by using the Copy and Paste commands in the Application Bar. In the Materials Stage, these commands copy and paste materials—rather than objects—so you can quickly apply an existing material to new surfaces.
 Copy Material: To copy a material, first double‑click a surface that uses it to select that surface. Then, in the Application Bar, choose Copy or press CTRL+C on your keyboard. Note: Copy will not work if more than one surface is selected.
 Paste Material: Paste a copied material onto any selected surface by choosing Paste from the Application Bar or pressing CTRL+V. The last material you copied will be applied to all selected surfaces.