Smart Data in Construction
Exclusive to Vip3D, Smart Data will add and update your construction plans spec sheet for you. You’ll get an easy-to-read, easy-to-use breakdown of complex calculations. Unlike manual construction spec sheets, these are dynamic.
Smart Data Blocks make it possible to display automatic detailed calculations for your projects. This includes Turn Downs, Step Risers, Dirt Displacement, Concrete Yardage, Rebar, and more.
When you create the block, you choose which types of data will be displayed.
ADD SMART DATA BLOCK
There are 2 ways to add Smart Data blocks to your construction plan:
1. Click Insert Smart Block located at the bottom of Smart Data.
2. Click Insert Object in the Panel. This will open the Insert New Object dialog, where you can select the Smart Data option.
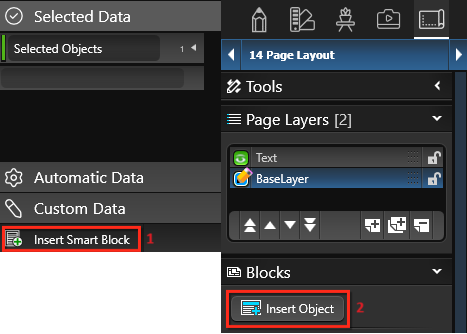
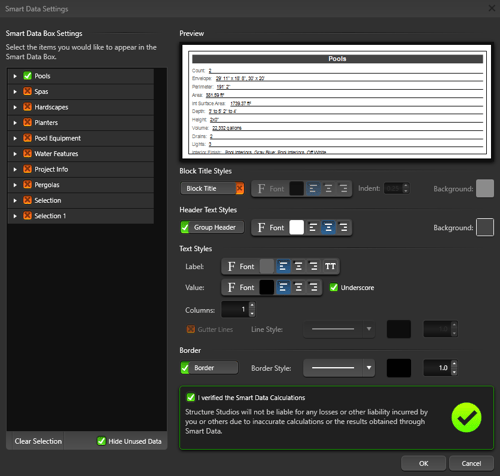
This will open the Smart Data Settings dialog:
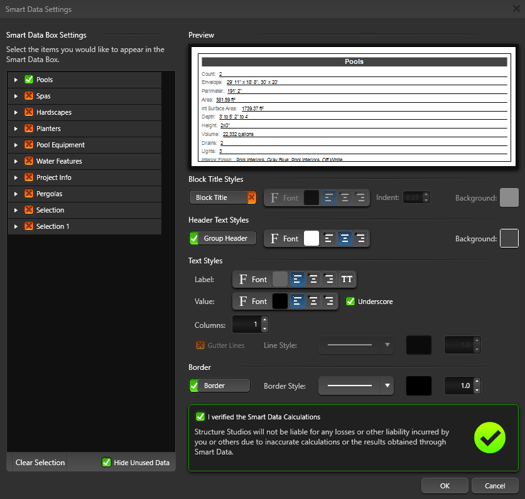
CUSTOMIZE SMART DATA BLOCK
Select the Categories you would like to appear, check entire categories, or click the arrow to select individual pieces of data.
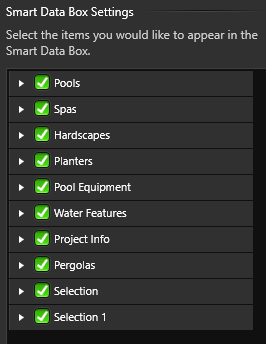
Settings: If the box next to the Category displays a Green Check, everything in that category will appear.
If the box displays a Red X, everything in that category will be hidden.
White Arrow: Left click the white arrow or name to display a detailed list of data for that category.
Hide Unused Data: Groups that are not present in the project will not appear in the list. Uncheck to reveal all categories, even those without any active data.
Next customize the visual appearance of the block and see changes in the preview window.
Box Title Styles: Add a name/title to the block. Adjust the font style and size, color, alignment and background for the title.
Header Text Styles: Add a group header at the top of each category. Adjust the font style and size, color, alignment and background for the header.
Text Styles: Adjust the font settings for the label on the left and value on the right. Adjust the columns setting to space the data over set number of columns. Add gutter lines between each column, and adjust the line style, color and size.
Borders: Add a border around the block, and adjust line style, color and size.
Verify Data: Verify all calculations that are automatically generated. Make sure your shapes are drawn correctly, and to scale. Ensure real numbers take into account over break, over excavation, voids, rock displacement, settlement, and any other real world challenges.


Press the Ok button when done.
EDIT SMART DATA BLOCK
To change or format a smart data block, press the Object Settings button.
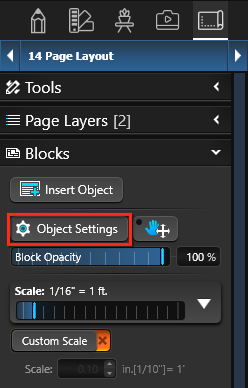
The Object Settings button allows you to change settings of an inserted Smart Data Block.
Simply select an already created block with the Move Tool.
Once the object is selected, click the Object Settings button.
Changes to the Design: If you need to adjust the dimensions of a deck or pool in your project, you can easily make the changes in design mode. The smart data will automatically update to reflect the new size.
Manual Changes to the Smart Data Block: The information listed on the smart data block may also be changed manually. This allows you to enter different material names you use or change the quantity to reflect actual build amounts.
- Move Data: Click and drag the data to move in the list.
- Remove Data: Highlight the data and press delete to remove it from the block.
- Change Data: Double click the data to manually change the text.
Note: If the value on the right is adjusted, a yellow question mark will appear to notify you that the information was entered manually. Click the question mark to restore the default value.
SAVE SMART DATA TEMPLATE
You can save your Smart Data Blocks to the Construction Library for future use. This allows you to create a single template that can be inserted on pages, create new page templates, or update existing templates with smart data blocks.
In all future projects, the template or page will automatically populate with the specific values for each project. This eliminates the need to manually fill out the information every time, saving you time and ensuring accuracy.
Save to Library: With the Smart Data Block selected, press the Save to Library button.
When you open the Create New Template dialog, you will see a preview image of your Smart Data. From the drop-down lists, you can select the Category and Type where you want to save the block. Give your block a Name and you also have the option to enter a Description.
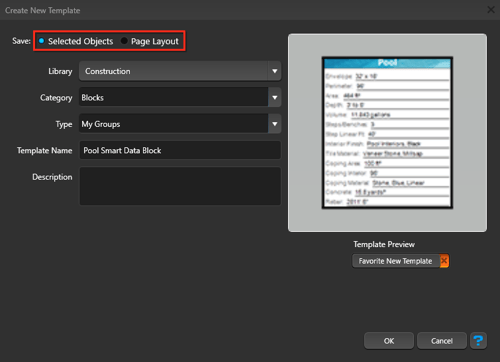
Save a Single Block: Choose “Selected Objects” at the top.
Save a Page Template: Choose “Page Layout” at the top.
Press the Ok button when done.
NOTE: If your template or block contains custom data specific to a single project, the field will appear blank in future projects.
For more information about saving Smart Data Templates, see Page Layout.