Selecting Objects
You may select and move many objects in 3D. Specifically, shapes drawn in the House and Custom Shapes stages and almost all items inserted from the library may be selected and then moved, rotated, and scaled with the 3D gizmo.
Shapes drawn in other stages may not be moved in the 3D view but can be selected and moved in the 2D view.
Selecting by Clicking: To select objects in 3D, double left click on any object. The selected object will be highlighted in red and your view will rotate to focus on it.
To select multiple objects, press and hold CTRL and single left-click the objects you want to select to add them to the selection. To subtract an object from the current selection, left-click on that selected object while holding the Ctrl key.
Selecting with the Selection Marquee: With the selection marquee, you can easily select a group of objects with a single mouse movement. Hold the Shift key on your keyboard. The cursor will change indicating that it is activated.
While holding Shift, left-click on any point in the viewport, hold the left mouse button and drag your mouse. You will notice the selection marquee being created and expanded as you move your mouse.
When you release the left mouse button, all the objects that are included inside the selection marquee will be selected. The selected objects will be highlighted in red and your view will rotate to focus on them.
You can add more objects to the selection with the selection marquee by pressing and holding the Ctrl and Shift keys and following the same procedure above. You may unselect the items by pressing the Reset button at the top of the screen.
Moving Objects
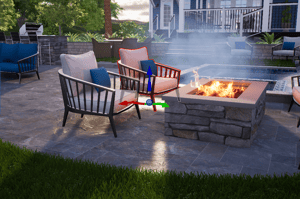
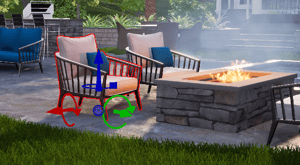
Selected objects may be moved by using the 3D gizmo. You may move single objects, multiple objects, and groups.
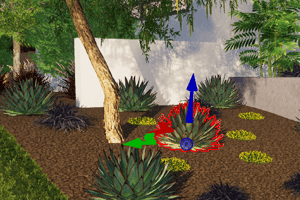
Blue Arrow: Elevate objects up and down.
Red and Green Arrows: Move objects left to right and back and forth.
As you move the cursor over the arrow, it will highlight. Left click and hold to move the object. Manually elevate objects by using the elevation box in the Panel. By default objects will be set to Auto Elevation. Turn Off auto elevation to enter a manual elevation into the box.
Rotating Objects
Rotating objects in the 3D viewport allows for more options than rotating in the 2D viewport. Only in 3D can you rotate the selected objects on the red and green arrows. This allows you to tilt objects upright.
Select the object you want to rotate, move the cursor over the arrow, click and hold the left mouse button, and drag the mouse to rotate the object. Release the left mouse button to complete the action. Objects will rotate based to your Angle Snap settings.
Only shapes drawn in the Custom Shapes stage or items inserted from the library may be rotated with the red and green arrows. Shapes drawn in the house stage as well as some items from the library such as house decor items may only be rotated with the blue arrow. You may also rotate multiple objects and groups the same way.
Please note that the rotation options for a group may limited by the items in the group. For example if a group contains both shapes drawn in the House stage and shapes drawn in the Custom Shapes stage, the group as a whole will only be able to rotate with the blue arrow.
You can also rotate objects by using the Rotation box found under Object Properties.
Scaling Objects
Scaling objects in the 3D viewport is very similar to scaling them in the 2D viewport. You can scale the selected objects uniformly.
When you move the cursor over the 3D gizmo, all the arrows will be highlighted.
Left-click and hold any arrow of the gizmo, and drag the mouse to scale the selected objects. Release the left mouse button to complete the action. You can also scale objects by using the Scale box found under Object Properties.
World and Object Alignment
The Alignment Button in the center of the 3D gizmo allows you to change the orientation of the arrows. Left clicking on the button will switch the setting.
“W” represents world alignment and means that the arrows will be orientated to the world.
“O” represents object alignment and means that the arrows will be orientated to the position of the object.
The alignment can be changed with any tool, but is especially important with the rotate tool.