Hardscape - Stage Options
 Height: This option allows the hardscape height to be adjusted.
Height Label: By default, the height of the hardscape is displayed. Uncheck this option to hide this label in the 2D view and in Construction.
Follow Terrain: This control allows the hardscape to follow the slope of the terrain. This is perfect for creating a driveway. When off, the hardscape will cut through the terrain and create a level surface.
Edge Trim: Toggle allows you to add or remove edge trim to the corners of a selected hardscape.
Edge Trim Width: This control allows you to adjust the overall width of the edge trim. The limit ranges from 1" to 6".
Coping: Toggle allows you to add or remove coping to the outside edge of the selected hardscape.
All Sides: Toggle adds coping to all sides of Hardscape. When off, coping will not appear on sides where a taller shape appears, or where terrain is above the hardscape.
Coping Draw Mode: This mode allows you to use the drawing tools to create exactly the coping you need on your hardscape. See More in our Custom Coping Article
Coping Width: This control allows you to adjust the overall width of the coping. The limit ranges from 1" to 24". Coping options will change the way Area is calculated on Hardscapes. Under Object Properties, the Hardscape area and the Coping area values will both be displayed.
Coping Line: By default, the coping line of the hardscape is displayed. Uncheck this option to hide the coping in the 2D view and in Construction.
Lip Style: Here you can select the lip style for your coping from the drop-down menu. A preview of each style is to the left of the name.
Lip Height: This control allows the height of the Lip to be adjusted from 1″ to 6″. Default is 3″.
Concrete Score Mode: See our Concrete Score Lines and Expansion Joints Article
Generate Railing on Deck: This control allows you to automatically add a railing to the selected hardscape.
Wood Deck - Stage Options
It’s easy to adjust wood decks by simply double-clicking on any given section. As you double-click on each section of the deck, the panel menu updates to show you the options available. You can also click on the various sections in the panel menu to switch as well.
Fascia and Skirt
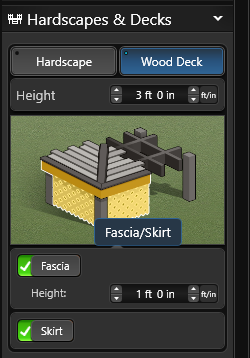
Height: This option allows the wood deck height to be adjusted.
Fascia: Toggle allows you to add or remove fascia to a selected wood deck.
Fascia Height: This control allows you to adjust the overall height of the fascia.
Skirt: Toggle allows you to add or remove the skirt of a selected wood deck.
Surface Boards
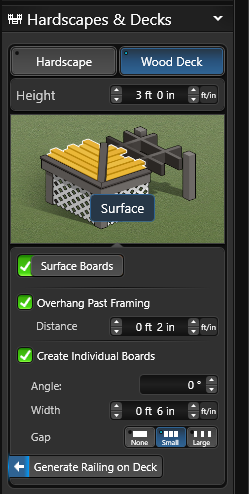 Surface Boards: Toggle allows you to add or remove surface boards to a selected wood deck.
Overhang Past Framing: By default, the surface boards overhang the frame. Uncheck this option for the surface boards to stop at the frame.
Distance: This control allows you to adjust the overhang distance of the surface boards.
Create Individual Boards: By default, the wood deck will have individual surface boards. Uncheck this option to create one solid board.
Angle: This control allows the angle of the boards to be adjusted from 0° to 180°. Or select the Rotate Tool from the panel menu.
Width: This control allows the width of the boards to be adjusted.
Gap: This control allows the gap between the boards to be adjusted. Choose from None, Small or Large.
NOTE: Surface boards must be active to automatically Generate Railing on a Deck.
Miters and Dividers
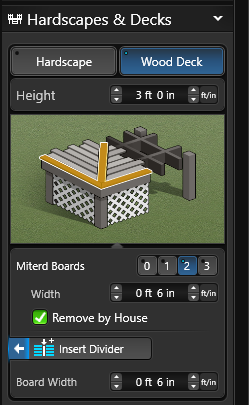
Number: This control allows mitered boards to be added around the wood deck. Choose from None, One, Two, or Three.
Width: This control allows the width of the boards to be adjusted.
Remove by House: By default, the mitered boards are removed where the wood deck touches the house. Uncheck this option for the mitered boards to appear next to the house.
Insert Divider: This control allows you to automatically add a divider board to the selected wood deck.
Note: This control is only available while in 2D.
Board Width: This control allows the width of the divider boards to be adjusted.
Posts
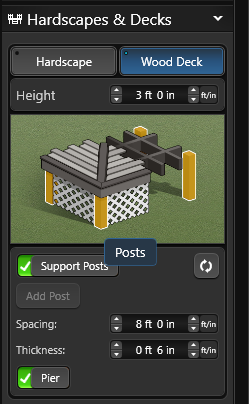 Support Posts: Toggle allows you to add or remove support posts to a selected wood deck.
Add Post: This button allows you to add a support post.
Spacing: This control allows the spacing of the support posts to be adjusted.
Thickness: This control allows the thickness of the support posts to be adjusted.
Pier: By default, piers are added to the posts. Uncheck to remove piers.
Framing
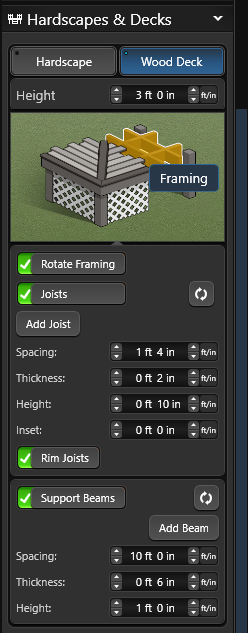 Rotate Framing: Toggle allows you to rotate the framing of a selected wood deck.
Joists: Toggle allows you to add or remove joists to a selected wood deck.
Add Joist: This button allows you to add a joist.
Spacing: This control allows the joist spacing to be adjusted.
Thickness: This control allows the joist thickness to be adjusted.
Height: This control allows the joist height to be adjusted.
Inset: This control allows the inset of the support beam into the framing to be adjusted.
Rim Joist: Toggle allows you to add or remove rim joists to a selected wood deck.
Support Beams: Toggle allows you to add or remove support beams to a selected wood deck.
Add Beam: This button allows you to add a support beam.
Spacing: This control allows the spacing of the support beams to be adjusted.
Thickness: This control allows the thickness of the support beams to be adjusted.
Height: This control allows the height of the support beams to be adjusted.
Staircase System
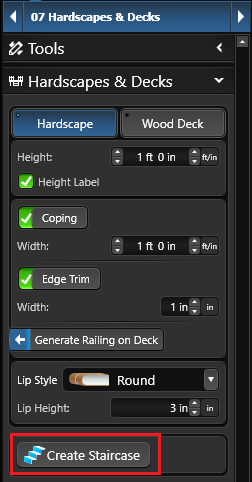 To add a staircase, left-click the Create Staircase button. When you move your cursor to the viewport, the staircase will follow until you left-click to place it.
Staircases will automatically snap to any shape they touch. By default, the staircase will be 4 feet wide and extend from the top of the shape down to the next lowest platform or ground.
4 Staircase Types are Available:
Normal: Straight stairs feature a single linear flight
Arc/Corner: Straight stairs that start on an arc or corner
Rounded: Round wedding cake style steps
Square: Square wedding cake style steps
Once the staircase is placed, you can customize the Staircase by using Staircase Options below.
Staircase Options
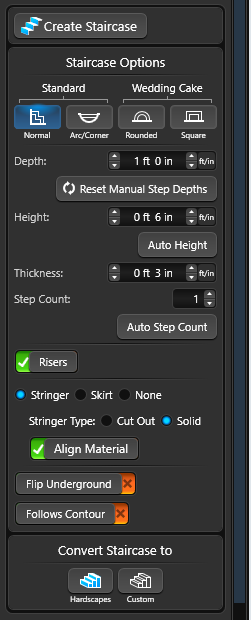 Depth: This control allows you to adjust the depth (or width) of each step. To adjust the width of an individual step, use the point on the center of the step.
Note: Adjusting the depth in the panel will reset all manually adjusted steps.
Height: This control allows you to adjust the height (or rise) of each step.
Auto Height: This button automatically adjusts the staircase to fit. For example, if Auto Height is selected and you change the height of each step, the step count will automatically change.
Thickness: This control allows you to adjust the height of the cap/lip of each step.
Step Count: This control allows you to adjust the number of individual steps in the selected staircase.
Auto Step Count: This button automatically adjusts the number of steps in the selected staircase. For example, if Auto Step Count is selected and you change the depth of each step, the step count will automatically change.
Risers: This toggle allows you to add or remove risers to the staircase.
Skirt: This option allows you to add a skirt to the staircase.
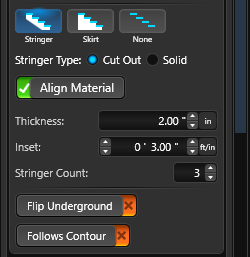 Stringer: This option allows you to add stringers to the sides of the staircase.
Stringer Type: With Stringer active, choose between Cut Out or Solid stringers.
Align Material: This toggle allows you to have the material follow the angle of the stringer.
Thickness: This control allows you to adjust the thickness of the stringer.
Inset: This control allows you to adjust the inset of the stringer.
String Count: This control allows you to adjust the number of stringers.
Flip Underground: This toggle allows you to change the direction the staircase faces. This tool is useful when making staircases to lower areas, such as to a sunken seating area.
Follow Contour: This toggle allows you to follow the contour of an arc around a shape, for shapes like spiral staircases.
Convert To Hardscapes: This button allows you to convert the staircase to editable shapes in the Hardscapes & Decks Stage.
Convert To Custom: This control allows you to convert the staircase to editable shapes in the Custom Shape & Pergola Stage.
Library
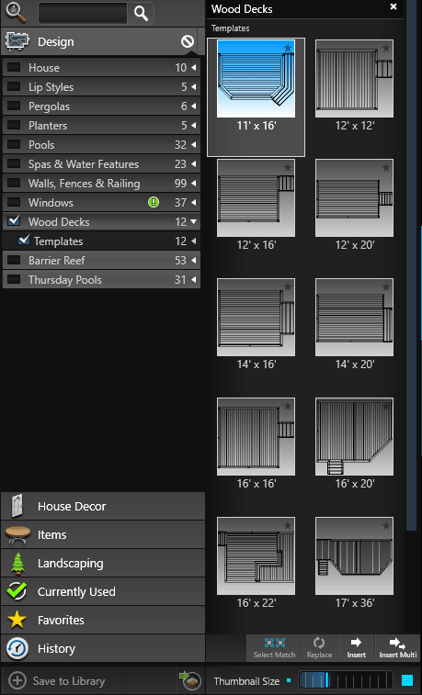 The Library contains templates of previously drawn deck shapes. The templates are organized by Type under the Hardscapes Category.
Select the deck template you wish to insert and either click the Insert One button or double left click on the image of the template. When you move your cursor to the viewport, the template will follow until you left-click to place the item. You can also save templates you have drawn for future use with the Save button.
TIP: Saving templates to your library will save you time on future designs.