Designing the Pool
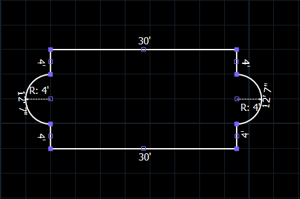 Changing a Complete Pool Shape: There are two main ways to change a pool shape once you have already completed it. You may use the Move tool to drag the segments of the pool to lengthen them. You can do this by selecting one of the segments of the pool with the Move tool and then dragging it. The other segments of the pool will increase as you drag the selected segment. The Perpendicular Constraint helps when using this method.
 You may also change the shape of your pool by deleting and redrawing segments. Select the pool shape with the Move tool. Then select one segment by clicking on a midpoint or two segments by clicking on an end point. Press the delete key to delete the segments. You can now redraw the deleted segments and change the shape of your pool.
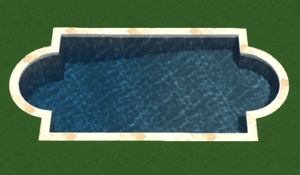
Pool Water: The pool will have water in it while in 3D. To make it easy to work on the interior of the pool, you can hide the Pool Water under Hide/Unhide until you create the 3D presentation in Presentation Mode.
Steps and Benches: Steps and benches can be added to your pool in the Steps and Benches Stage.
Pool Interior: Surfaces may be applied to the pool interior in the Materials Stage.
Stage Options
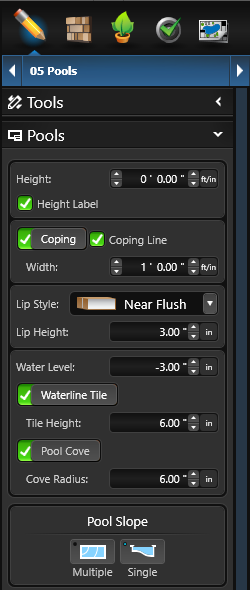 Height: This option allows the pool height to be adjusted.
Height Label: By default, the height of the pool is labeled. Uncheck this option to hide this label in the 2D view and in Construction.
Coping: Toggle that allows you to add or remove coping to the pool.
Coping Line: By default, the coping line of the pool is represented by an outer line around the pool shape. Uncheck this option to hide this line in the 2D view and in Construction.
Coping Width: This control allows you to adjust the overall width of the coping. The limit ranges from 1″ to 24″.
Lip Style: Here you can select the lip style for your coping from the drop-down menu. A preview of each style is to the left of the name.
Lip Height: This control allows the height of the Lip to be adjusted from 1″ to 6″. Default is 3″.
Water Level: This control allows the water level to be adjusted. The default is – 3″, half the height of the default waterline tile height.
Set to 0″, for the water to appear at the bottom of the lip. Set a positive value to move the water onto the lip.
Note: The value cannot be set above the Lip Height.
Waterline Tile: This option allows you to add a tile line to the pool. Uncheck this option to hide the tile line.
Tile Height: This control allows you to adjust the overall height of the tile line. The limit ranges from 1″ to 36″.
Pool Cove: By default, the pool cove creates a smooth transition between pool walls and floors, resulting in a more realistic pool bottom. Uncheck this option to create a hard edge.
Cove Radius: This control allows the radius of the Pool Cove to be adjusted from 6″ to 12″. Default is 8″.
Pool Slope
To set the depth of the pool, select the pool to activate the Pool Depth buttons.
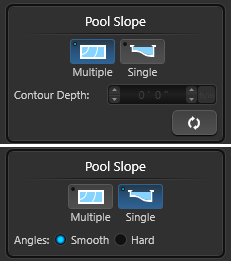
Multiple Pool Slopes: Useful for "L" shaped pools, or unique shaped pools. This works very similar to Multiple Slopes for Terrain.
Single Pool Slope: Useful for the average geometric or free-form pool shape.
Pool Slope is covered in our Pool Slope Article.
For beach entries, see our Beach Entry Article.
Insert Spillover
To add a spillover, select the pool to activate the Insert a Spillover button. When you left-click the Insert a Spillover button, the spillover will automatically snap to the edge of the pool. When you move your cursor to the viewport, the spillover will follow the pool until you left-click to place it. The spillover will also conform to the shape of the pool, bending around corners and curving around arcs.
Once the spillover is placed, you can customize the Spillover by using Spillover Options under the Object Tab.
Spillover Options: Spillover, Forward Negative Edge, Tiered and Reverse Negative Edge.
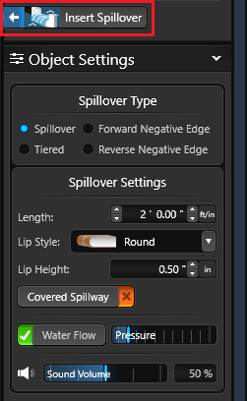 Length: This control allows you to set the length of a spillover or edge feature, adjusting how wide or narrow it is. As you increase the length of the spillover or edge feature it will continue to conform to the shape of the pool.
Adjust the length in a single direction with the Spillover grab handles. With the Move tool, click and drag the points at the end of the Spillover to adjust it.
Lip Style: Here you can select the lip style for your coping from the drop-down menu. A preview of each style is to the left of the name.
Lip Height: This control allows the height of the Lip to be adjusted from 1″ to 6″. Default is 3″.
Covered Spillway: This option allows the beam to continue over spillovers. Uncheck this option to remove coping from above the water feature.
Water Flow: This check box turns the water flow of a water feature on or off. This allows you to show the dam wall clear of the water from the feature.
Pressure: This slider allows you to adjust the pressure at which the water flows over a spillover or edge feature.
Volume: This slider allows you to adjust the sound of the water feature in 3D and Presentation Mode.
Tiered Spillover Settings:
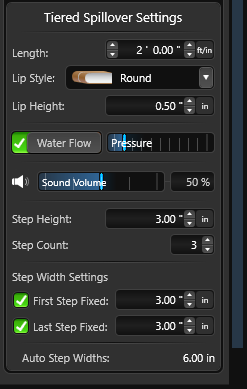 Step Height: This control allows the height of the steps to be adjusted from 1″ to 12″.
Step Count: This control allows you to set the number of tiers/steps on the spillover.
First Step Fixed: This checkbox allows you to set a fixed width for the first (top) step.
Last Step Fixed: This checkbox allows you to set a fixed width for the last (bottom) step.
Auto Step Width: This displays the size of each tier/step based on the step count.
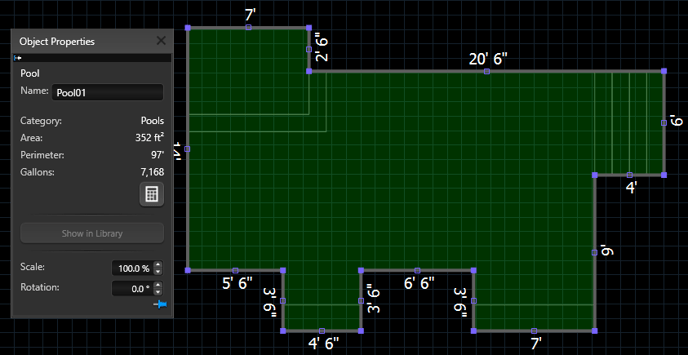
Pool Information
Object Properties displays information and measurements about the currently selected Pool.
You can find the Area, Perimeter and Gallons.
For more information, see Object Properties.
Library
The Library contains templates of previously drawn pool shapes. The templates are organized by Type under the Pools Category in the Design Tab.
Select the pool template you wish to insert and either click the Insert button or double left click on the image of the template. When you move your cursor to the viewport, the template will follow until you left-click to place the item.
Save Pool Templates
You can also save pool templates you have drawn for future use with the Save button. The Save button located at the bottom of the Library allows you to save your custom pool templates into the Library.
This box will display a preview image of the pool template you are saving to the library. Select the Category and Type and give your pool a template name. You may also enter a Description for the pool if you would like.
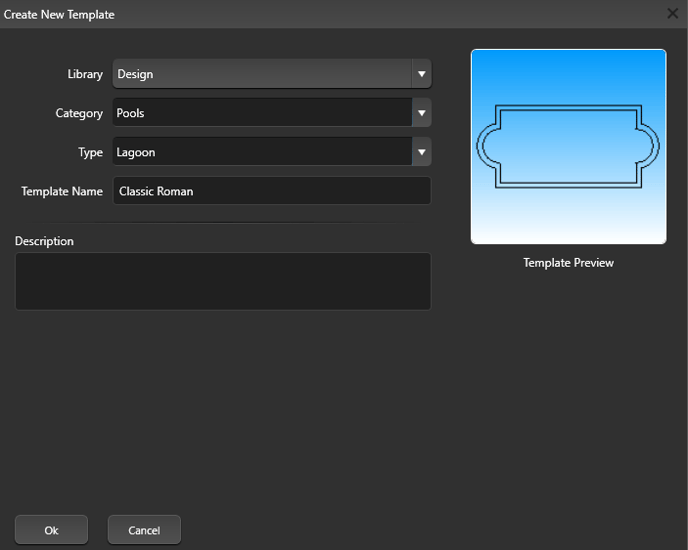
To create a new category or type, simply type in the new category or type name instead of selecting from the drop down list.
Press the Ok button when you are done.