Application Bar
![]() Application Button: Open the main menu to access core settings and features.
Application Button: Open the main menu to access core settings and features.
![]() Home Button: Open the home/start screen.
Home Button: Open the home/start screen.
![]() New Project Button: Create a new project (CTRL + N)
New Project Button: Create a new project (CTRL + N)
![]() Open Project Button: Open an existing project (CTRL + O)
Open Project Button: Open an existing project (CTRL + O)
![]() Save Project Button: Saves the current project (CTRL + S) Note: Each time you click Save, the previous file with the same name is overwritten.
Save Project Button: Saves the current project (CTRL + S) Note: Each time you click Save, the previous file with the same name is overwritten.
![]() Media Viewer Button: Open the Media Viewer so you can browse all screenshots and videos for the current project.
Media Viewer Button: Open the Media Viewer so you can browse all screenshots and videos for the current project.
Application Button Menu
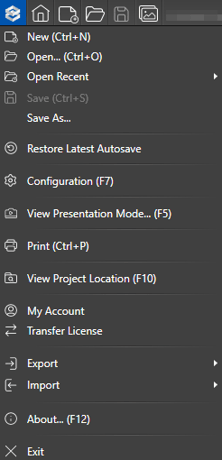 New: Opens a new project. If you have unsaved changes in the current project, a message window appears so you can save your changes or skip saving.
The new project opens immediately after you save or skip.
Open: Opens an existing project that you choose from a list of previously created projects. If you have unsaved changes in the current project, a message window appears so you can save your changes, skip saving, or cancel the action.
The selected project opens immediately after you save or skip. If you cancel, you return to the current project.
Open Recent: Displays a list of the most recently opened projects.
Save: Saves the current project. Each time you click Save, the previous version of the file with the same name is overwritten.
Save As: Saves the current project under a new name of your choice, creating a separate file for the same project.
Restore Latest Autosave: Opens the most recent autosaved version of your project. By default, the software autosaves every 5 minutes, but you can adjust this interval to anywhere between 5 and 60 minutes in Configuration. Up to three previous revisions are retained.
NOTE: If Autosave seems slow, follow these steps to create an exception in your anti-virus program.
Configuration: Opens the Configuration window, where you can adjust video settings, presentation speed, measurement units, language, and other options. See Configuration for more information.
View Presentation Mode: Opens the current project as an interactive, real-time tour in Presentation Mode.
Print: Opens the Print Preview window, where you can review and adjust your print settings, then click “Print” to send the job to your printer. See Printing for more information.
View Project Location: Opens the project folder, which includes your .sav file along with all related screenshots, videos, and documents.
My Account: Link to the account management page.
Transfer License: Allows you to transfer your license from one computer to another for use by the same designer, for example from a desktop to a laptop. For more information, see Transfer License.
Export: Exports your current drawing to a different file format.
Import: Imports information from supported external file formats into the software. For more information see Exporting and Importing.
About: Displays information about the software, including the current version number, your license key, and your video card details.
Exit: Closes the software. If you have unsaved changes in the current project, a message window appears so you can save your changes, skip saving, or cancel. The software closes immediately after you save or skip.
Project Information
Here you can enter or edit key project details, including the client’s name, email, phone number, and property address.

Client: Enter or update the client’s name.
Client Email: Add or change the client’s email.
Client Phone: Add or change the client’s phone.
Address: Add the property address. When you use a GIS Image, this address is generated automatically. For Vip3D members, entering the address sets the real-world location and ensures accurate shadow rendering.
You can update this information at anytime, by clicking the File Name to open the Project Information Screen.
![]()
In the Presentation Stage you can display this information on your screenshots, videos and presentations.
 Designer Info Overlay: Display your company name, designer name, client name and logo.
Company Logo: Here you can add your company logo. To insert a logo, click the folder icon and an Open dialog will appear; locate the image you want and click Open.
The logo will appear in the bottom-left corner of your screenshots, videos, and presentations. You can set its size to Small, Medium, or Large.
Supported image formats are JPG, PNG, BMP, and TGA. Transparency is supported in PNG and TGA files.
For best results, use an image no larger than 200 × 200 pixels and under 1 MB in total file size. Larger logos may affect performance or fail to display in presentations.
2D Viewport
The 2D viewport is where you create and edit your design. It shows a strictly 2D representation of the project, like a conventional technical drawing, and is where most object actions—adding, removing, and rearranging—are performed.
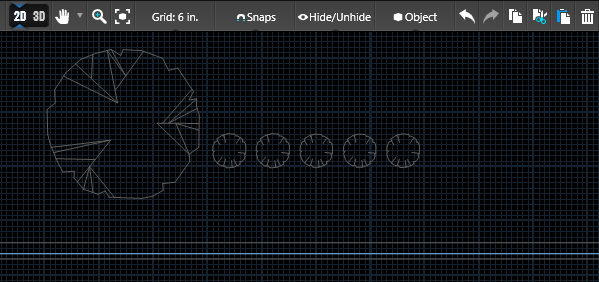
At the top of the viewport are buttons to manipulate the viewport display. These buttons are explained below. Activate the buttons by single-clicking on the icon with the left mouse button.
![]() This button changes the viewport from 2D to 3D. Single-click the left mouse button on the icon to display your scene in instant 3D.
This button changes the viewport from 2D to 3D. Single-click the left mouse button on the icon to display your scene in instant 3D.
![]()
Pan Tool: At any given time, some of your project may not be visible in the viewport.
The Pan tool shifts the view in the 2D viewport. Activate the Pan tool and position the cursor in the viewport. Click and hold the left mouse button and move the mouse to adjust the view.
You can also use middle mouse button for panning. Holding the middle mouse button and moving your mouse around will pan the 2D viewport.
![]() Zoom Tool: The Zoom Tool changes the magnification of the entire project, letting you see more or less of the design at once.
Zoom Tool: The Zoom Tool changes the magnification of the entire project, letting you see more or less of the design at once.
This is useful when working with large shapes or full-yard layouts.
Activate the Zoom Tool and move the cursor into the viewport. Click and hold the left mouse button, then move the mouse up to zoom in or down to zoom out. You can also zoom with the middle mouse wheel. Scroll up to zoom in and scroll down to zoom out.
![]() Zoom to Extents Tool: While designing, you may want to quickly zoom in on a particular object. The Zoom to Extents tool will zoom the 2D view so that a currently selected object fills the view.
Zoom to Extents Tool: While designing, you may want to quickly zoom in on a particular object. The Zoom to Extents tool will zoom the 2D view so that a currently selected object fills the view.
If nothing is selected, the view will zoom out so that you can see your entire project. Select an object in your design with the Move tool and then left click on the Zoom to Extents tool. With nothing selected, left clicking on the Zoom to Extents button will zoom out and show the entire project.
![]() The Grid: This button controls the size of the background grid. Single-click the left mouse button on the grid button to display a list of possible grid spacing. Single-click on the grid size you want.
The Grid: This button controls the size of the background grid. Single-click the left mouse button on the grid button to display a list of possible grid spacing. Single-click on the grid size you want.
3D Viewport

By default, the 3D viewport is focused on the pool. You can change the view displayed in the viewport by rotating or zooming about the object in focus, or changing the focus to a different object or group of objects.
![]() 3D Viewport Button: This button changes the viewport from 3D to 2D. Single-click the left mouse button on the icon to display your project in 2D.
3D Viewport Button: This button changes the viewport from 3D to 2D. Single-click the left mouse button on the icon to display your project in 2D.
![]() Pan Tool: Hold down the center mouse wheel to pan your view.
Pan Tool: Hold down the center mouse wheel to pan your view.
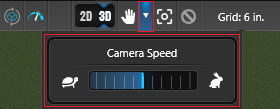
Camera Speed: Click the down arrow next to the Pan Tool to adjust your 3D camera speed.
![]() Zoom to Fit Button: This button resets your focus to the center of your project.
Zoom to Fit Button: This button resets your focus to the center of your project.
![]() Deselect Button: This button deselects anything you have selected.
Deselect Button: This button deselects anything you have selected.
Navigation
Rotate: Click and hold the left mouse button, move the mouse to adjust the view of the selected object.
Zoom: Click and hold the right mouse button, move the mouse to adjust the distance to the selected object.
Focus: Generally, double-clicking an object in the viewport with the left mouse button highlights it in red and shifts the camera focus to that object. You can select both library objects and drawn shapes this way. This feature is available only when Select Any Object is enabled or when you are in the appropriate stage for that object.
If you prefer that the camera not shift focus to the selected object, disable this option in Configuration under 3D Settings.

Focus on Multiple Objects: Single-click each object while holding the Ctrl key. Or use the selection marquee by holding down the Shift button and dragging the mouse with the left mouse button held down at the same time.
Edit Objects: When you select one or multiple objects, the 3D Gizmo will appear in the center point of the selection. By using the 3D Gizmo, you can move the selected items horizontally and vertically as well as rotate them. You can also scale them uniformly. Please note that grouping objects of different types may limit the movement options.
For more information, go to Editing the Objects.
Snaps
![]() Snaps give you precise control over how you draw and move objects. Different snap options help you create straight lines and apply even rotations. Click the checkbox to enable a snap control, and choose an Angle Snap value by selecting its radio button. For more information, go to Snaps.
Snaps give you precise control over how you draw and move objects. Different snap options help you create straight lines and apply even rotations. Click the checkbox to enable a snap control, and choose an Angle Snap value by selecting its radio button. For more information, go to Snaps.
Hide/Unhide
![]()
Object
![]() Object displays information and measurements about the currently selected object or group of objects. The information displayed depends on the type of the object selected. For more information, go to Object.
Object displays information and measurements about the currently selected object or group of objects. The information displayed depends on the type of the object selected. For more information, go to Object.
Edit Buttons
![]() Undo: Undoes the last and previous actions (you can undo up to 50 previous actions), in order.
Undo: Undoes the last and previous actions (you can undo up to 50 previous actions), in order.
You can also see the name of the action you undo. This option is grayed out when there is no undo action available.
![]() Redo: Redoes the actions that are undone, in order. You can also see the name of the action you redo.
Redo: Redoes the actions that are undone, in order. You can also see the name of the action you redo.
This option is grayed out when there is no redo action available.
![]() Copy: Makes a copy of the selected object so that you can paste it.
Copy: Makes a copy of the selected object so that you can paste it.
![]() Cut: Cuts the currently selected object so that you can paste it.
Cut: Cuts the currently selected object so that you can paste it.
![]()
Paste: Pastes the previously cut or copied object to the scene.
![]() Delete: Deletes the selected object from the scene.
Delete: Deletes the selected object from the scene.
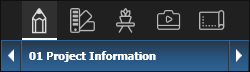
Panel
The Panel menu is located on the right side of the screen. This Panel menu breaks down the process of designing a project into steps. The panel displays different tools and options for each stage.
 The design process is divided into five main phases (Design, Materials, Plants & Items, Presentation and Construction), which each have an icon at the top of the Panel.
Each phase is then subdivided into Stages to simplify the process further.
For more information, go to Panel.
The Library and Smart Data
.png?width=248&height=283&name=image_360%20(1).png)
The Library Tab and Smart Data Tab are located on the left side of the Viewport. Single-click the left mouse button to expand the tab.
The Library contains templates, items, plants and trees, and vendor products.
The seven categories are Design, House Decor, Plants & Trees, Items, Currently Used, Favorites, and History. For more information, go to The Library.
Smart Data provides automatic detailed calculations for your projects.
This includes Turn Downs, Step Risers, Dirt Displacement, Concrete Yardage, Rebar, and more.
For more information, go to Smart Data.